Proto:Super Mario Kart/Debugging Menus
This is a sub-page of Proto:Super Mario Kart.
| This article is a work in progress. ...Well, all the articles here are, in a way. But this one moreso, and the article may contain incomplete information and editor's notes. |
| ...But what does it mean? This game has text or audio that needs to be translated. If you are fluent with this language, please read our translation guidelines and then submit a translation! |
| This page or section needs more images. There's a whole lotta words here, but not enough pictures. Please fix this. |
To do:
|
Contents
- 1 Main Debug Screen
- 2 Debug Menu Options
- 2.1 1st option (ワールト | "WORLD"): Cup Number
- 2.2 2nd option (コース | "COURSE"): Race Number
- 2.3 3rd option (レース スタート | "RACE START"): Grand Prix Test - Start
- 2.4 4th option (ハトル | "BATTLE"): Battle Mode - Set Battle Objects
- 2.5 5th option (マッフ | "MAP"): Battle Mode/EDIT1/EDIT2 - Set Track
- 2.6 6th option (ハトルスタート | "BATTLE START"): Battle Mode Test - Start
- 2.7 7th option (EDIT1): AI Zone and Target editor.
- 2.8 8th option (EDIT2): Object overlay editor
- 2.9 9th option (モート7 キャラ | "MODE7 CHARACTER"): Mode7 Tileset Viewer
- 2.10 10th option (COLOR MAP): Color Palette Viewer
- 2.11 11th option (DEMO1): Track Viewer / Object Editor (?)
- 2.12 12th option (DEMO2): Sprite Animation Test
- 2.13 13th option (サウント テスト | "SOUND TEST"): Sound Debugging
- 2.14 14th option (EXIT)
- 3 Unused Debug Menu Options
- 4 Earlier Debug Menus
- 5 Other Debugging Options
Main Debug Screen
This Debug Menu can be found in the following builds:
- May build
- mario-kart-* build
- kart-d build
- Early uncompiled February build
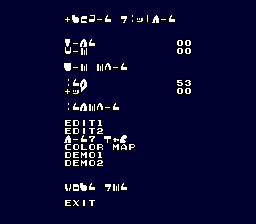
On all other prototypes, like the mkart build, the debug mode part of the ROM has been removed, possibly to save cartridge space. That's why it crashes on these builds when you try to load the debug mode; though it is possible that some development cartridges housed an extra EEPROM for the debug part of the ROM to be burnt on, hence why builds like the May build are split into two files. It can be accessed by pressing Start + Select on the title screen.
The kart-d build includes the debug menu, but is inaccessible without hex editing. To access it, open the ROM in a hex editor, and go to offset 0x80000, and insert the first 0x8000 bytes from kimura/kart/risc/bin/editchar.bin, and save the ROM. The Select + Start combo should now work and the menu should load.
Debug Menu translates roughly to
MARIO KART DEBUG MODE

WORLD                00
COURSE               00

RACE START

BATTLE               00
MAP                  00

BATTLE START

EDIT1
EDIT2
MODE7 CHARACTER
COLOR MAP
DEMO1
DEMO2

SOUND TEST

EXIT
The katakana on this menu does not use any dakutens or handakutens, however they can be implied when translating. For verification, check kimura/kart/risc/join/edit_data.asm.
Debug Menu Options
1st option (ワールト | "WORLD"): Cup Number
Sets the Cup ID to load.
2nd option (コース | "COURSE"): Race Number
Sets the track ID to load.
3rd option (レース スタート | "RACE START"): Grand Prix Test - Start
Start a Grand Prix or a Match Race (depends on what was selected before on the title screen), based on the cup and race number given by options 1 and 2 (shown below).
- It loads AI Zone, targets and object overlays from SRAM and not from the ROM itself. If no AI checkpoint data is stored in SRAM, the game crashes. Therefore it needs at least one AI Zone in the selected track placed and saved in SRAM in order to work (can be done with EDIT1 debug tool).
- In the kart-d build, it loads the configurations and AI directly from the ROM when no edits were saved in SRAM.
| Cup Number | Race Number | ||||
|---|---|---|---|---|---|
| 00 | 01 | 02 | 03 | 04 | |
| 00 | Mario Circuit 1 | Donut Plains 1 | Ghost Valley 1 | Bowser's Castle 1 | Mario Circuit 2 |
| 01 | Choco Island 1 | Ghost Valley 2 | Donut Plaint 2 | Bowser's Castle 2 | Mario Circuit 3 |
| 02 | Koopa Beach 1 | Choco Island 2 | Vanilla Lake 1 | Bowser's Castle 3 | Mario Circuit 4 |
| 03 | Donut Plains 3 | Koopa Beach 2 | Ghost Valley 3 | Vanilla Lake 2 | Rainbow Road |
The Grand Prix/Match Race will be in a Debug Mode. The race starts instantly (even before the countdown) and there are debug tools and commands accessible by pressing a certain button combination. Some of these debug tools can still be accessed in the final version via Action Replay codes.
| Button Combination | Debug Tool |
|---|---|
| Hold L + R and press Select | RAM Viewer / Editor Table |
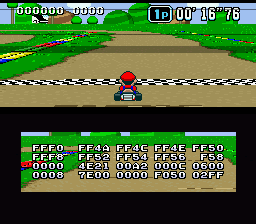
| Hold Down + L or R and press Select: | Mini RAM Viewer / Editor |
| Hold Up + L or R and press Select | CPU Usage Meter |
| Hold X+A+B and press Y | Enable Last Lap Cheat by pressing L. A piece of the Boo item (its mouth) will be displayed on the top left. |
| Hold L+R+X and press A: | Enable Item debugger. Another piece of the Boo item (its back) will be displayed on the top left. |
4th option (ハトル | "BATTLE"): Battle Mode - Set Battle Objects
- Completely unused. Intended use was possibly to set the battle mode objects overlay for use in Battle Mode Debugging.
5th option (マッフ | "MAP"): Battle Mode/EDIT1/EDIT2 - Set Track
Sets the track to load when using EDIT1, EDIT2 mode as well as Battle Mode. Uses the internal track ID numbers.
00: Mario Circuit 3
01: Ghost Valley 2
02: Donut Plains 2
03: Bowser Castle 2
04: Vanilla Lake 2
05: Rainbow Road
06: Koopa Beach 2
07: Mario Circuit 1
08: Ghost Valley 3
09: Bowser Castle 3
0A: Choco Island 2
0B: Donut Plains 3
0C: Vanilla Lake 1
0D: Koopa Beach 1
0E: Mario Circuit 4
0F: Mario Circuit 2
10: Ghost Valley 1
11: Bowser Castle 1
12: Choco Island 1
13: Donut Plains 1
14: Battle Course 3
15: Battle Course 4
16: Battle Course 1
17: Battle Course 2
>17: Garbage
6th option (ハトルスタート | "BATTLE START"): Battle Mode Test - Start
Starts a battle (requires you to select Battle Mode on the title screen before to prevent it from crashing).
- Loads AI Zones and object overlays from SRAM instead like Grand Prix/Mode (except kart-d build).
- Needs at least one AI Zone in the selected track placed and saved in SRAM in order to work (Can be done with EDIT1).
- Has many problems regarding crashing. Due to a DSP routine that attempts to overwrite a nonexistent racer object, overwriting an index to a routine.
7th option (EDIT1): AI Zone and Target editor.
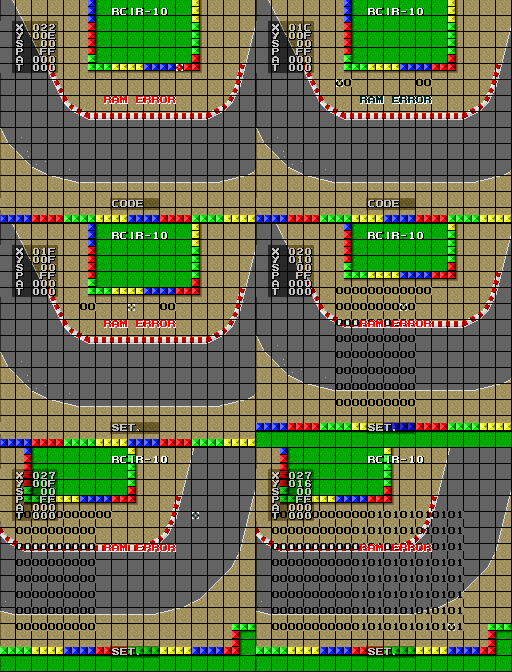
Editor for the AI zones as well as AI target/respawn points. It loads the selected track in the 5th option (マッフ) in a top-down view. It's also gridded. RAM ERROR is displayed on the screen if SRAM does not contain valid data.
There are also coordinates on the top left.
When pressing Select, you can shuffle through 3 options: SET., CODE and PONT.
CODE
Puts down numbers and letters by pressing Y that increase in 2 increments (00 - 0C). These are used to create AI zones. Putting one down and pressing B on it will increase it, pressing Y will decrease it. These numbers determine what form the zone will get.
Number that determines the form:
   00 = Rectangle
   02 = Triangle top-left
   04 = Triangle top-right
   06 = Triangle bottom-right
   08 = Triangle bottom-left
   0A = Diagonal Line top-right to bottom-left; UNUSED
   0C = Diagonal Line top-left to bottom-right; UNUSED
SET.
Sets the size of the AI zones by clicking on a code number with B, then pressing B somewhere to set the destination of the size. The exact placement of where you need to press B in order to place the zone differs for each zone type. Required position of the destination for each zone is listed below:
   00: Final X more right than start X, Final Y below start Y
   02: Final X equal to start X, Final Y below start Y
   04: Final X equal to start X, Final Y below start Y
   06: Final X equal to start X, Final Y above start Y
   08: Final X equal to start X, Final Y above start Y
   0A: Final X more left than start X, Final Y below start Y
        - X distance must be less than Y distance to work properly
   0C: Final X more right than start X, Final Y below start Y
        - X distance must be less than Y distance to work properly
PONT
Puts down target location and respawn points by pressing B (it also makes a coin sound). They are shown in the form of wall part. Pressing X on a square will change its color that determines the speed configuration of that checkpoint.
The color determines the speed:
   RED = speed 3
 GREEN = speed 2
  BLUE = speed 1
YELLOW = speed 0
Hovering over one of these blocks will set the values of S and P in the top-left window. S is the speed setting of the current target block, and P is the AI zone number that the target corresponds to.
Pressing R will reveal some other options that can be shuffled through by pressing Up and Down:
- S-RAM: S-RAM will be displayed on the bottom, and the options YES and NO also pop up. Selecting YES with the B button will play the sound of shooting a Koopa Shell and the text NOW SAVE will be displayed before disappearing.
This will save the current configuration of AI Zones, Targets, and Speeds to SRAM in a predetermined location based on the track number. Starting a race on this track from the Debug Menu or from the normal menu will load these configurations then. Most likely used by the developers for quick tests.
- CLEA (clear): Resets everything.
- L-DISK: Executes the LOAD system call for the SFX-DOS, and loads track data from an external floppy disk. Currently unfunctional without modding. See here
- L-RAM: Plays the Koopa Shell sound. This will load the configuration of AI Zones, Targets, and Speeds from SRAM from a predetermined location based on the track number.
- S-DISK: Executes the SAVE system call for the SFX-DOS, and saves the track data to an external floppy disk. Currently unfunctional without modding. See here
8th option (EDIT2): Object overlay editor
Loads an editor for placing the objects like Itemfields, Coins, Zippers and more.
Controls:
Press Select to choose tile type
    Up/Down - select different type
    Left/Right - select different direction
R cycle save options
L when R has been pressed seems to cycle through 10 slots
B to place object
Y to delete object
Object types:
QUES - Questionbox field
NIKO - Empty Questionbox field
AROW - Zipper
KABE - 2x2 Blockage with 4 colored blocks (unused in the final game)
OIL  - Oilslick
JUMP 0N - Jumpbar horizontal
JUMP 1N - Jumpbar vertical
COIN 0N - + shaped coins
COIN 1N - x shaped coins
COIN 2N - / shaped coins
COIN 3N - \ shaped coins
COIN 4N - - shaped coins
COIN 5N - | shaped coins
COIN 6N - Single coin
- Top banner:
- First Letter - Editing Mode: Y (presumably ”yakumono”)
- Next 3 Letters - Track Theme:
CIR = MC (CIRcuit)
QBA = GV (QBAke) ["obake" means ghost]
GRA = DP (GRAss)
CAS = BC (CAStle)
ICE = VL (ICE)
DAR = CI (DARt) [dirt]
SAN = KB (SANd)
- After Dash:
- First Digit - Map index in theme
- Second Digit: Save Slot
MC2: YCIR-1
GV2: YQBA-1
DP2: YGRA-1
BC2: YCAS-1
VL2: YICE-1
RR:  YDAR-1
KB2: YSAN-1
MC1: YCIR-2
GV3: YQBA-2
BC3: YCAS-2
CI2: YDAR-2
DP3: YGRA-2
VL1: YICE-2
KB1: YSAN-2
MC4: YCIR-3
MC2: YCIR-4
GV1: YQBA-3
BC1: YCAS-3
CI1: YDAR-3
DP1: YGRA-3
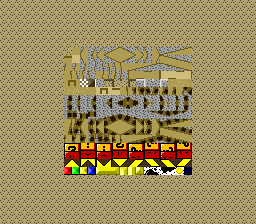
9th option (モート7 キャラ | "MODE7 CHARACTER"): Mode7 Tileset Viewer
Mode7 Tileset Viewer. Buggy.
- Unknown at this time if there is any intended control during this screen.
- Inconsistent palette during different tests.
10th option (COLOR MAP): Color Palette Viewer
Color Palette Viewer. Static, and buggy. Currently unknown whether there is any control over this option.
11th option (DEMO1): Track Viewer / Object Editor (?)
To do:
|
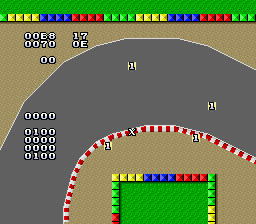
Loads a viewer in a top down view of the track selected in the Course and World value. The track's specific objects like pipes, thwomps, moles etc. and also Match Race objects like the Chain Chomps and the Bananas can also be viewed and edited. They will be displayed in the form of numbers while the number determines which kind of object and to which visibility area it belongs. It doesn't seem to be possible to save new edits however (Investigation needed).
Depending on which mode was accessed before, overlay objects like item fields can be displayed as well (Time Trial for example will remove them).
At the top-left are the coordinates and the currently placable object. The numbers at the middle-left side appear to be Mode7 values of how the track is zoomed and placed.
This editor has some differences in some builds:
- Only in the Feb build it is possible to rotate the track. There was also more Japanese text, displayed in place where the R and W letters are displayed in later builds.
- In the kart-d build the numbers were removed, zooming controls were added and the zoom is set to display the entire track by default. This might have been used to capture track previews for medias such as magazines, promos and also the game's manual.
Controls:
B - lays object
Y - removes object
X - changes number
Select - toggles cursor on and off and enables load (and save?) feature
Start+Select - goes back to menu
L - quick move
D-Pad - move

kart-d only:
Y - Zoom in
X - Zoom out
Number Meaning:
00 - ???
01 - Object, visible in area 1
02 - Object, visible in area 2
03 - Object, visible in area 3
04 - Object, visible in area 4
05 - Chain Chomp Horizontal
06 - Chain Chomp Vertical
07 - Banana
Pressing Select will remove the coordinates and the cursor.
Holding R will display the letter R and pressing B then will load the objects for the track.
Holding L displays a W and pressing B then will display some garbaged tiles for a short moment (possible for saving?). Replacing the font with the Japanese font type will fix the garbaged tiles (shown right). (Translation needed).
12th option (DEMO2): Sprite Animation Test
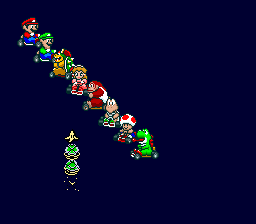
Displays character models with Mario, Luigi, Bowser, and Princess Toadstool spinning. It also includes miscolored sprites of two shells and a banana.
13th option (サウント テスト | "SOUND TEST"): Sound Debugging
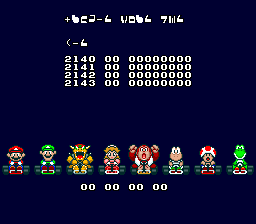
Displays the four sound effect registers.
- 2140: Main SFX register. Values given below (Confirmation needed)
	01: "Race Fanfare" song
	02: **"Time Trial Countdown" song
	03: "Race Countdown" song
	04: **SNES-loaded Song
	05: "Final Lap Jingle" song
	06: "Last Lap" version of SNES-loaded Song
	07: Even Faster version of SNES-loaded Song
	08: "Starman Theme" song
	09: "Race Qualified" song
	0A: "No Record" song
	0B: "Rank Out" song
	0C: "Mario's Rank" song
	0D: "Luigi's Rank" song
	0E: "Bowser's Rank" song
	0F: "Peach's Rank" song
	10: "DK Jr's Rank" song
	11: "Koopa Troopa's Rank" song
	12: "Toad's Rank" song
	13: "Yoshi's Rank" song
	14: "Game Over" song
	15: Super fast SNES-loaded Song
	16: SNES-loaded Song
	17: ???
	18: ???
	19: ???
	1A: ???
	1B: ???
	1C: ???
	1D: Silence Music
	1E: Fade out Music while playing
	1F: Hang Last Played Notes
	20: Coin
	21: Hop/Ramp (Probably Hop)
	22: Monty Mole Hole Hop
	23: Choco Island Bump Hop/Cheep Cheep Balloon Inflation
	24: Feather Jump
	25: Landing from Hop
	26: Racer "Poof"
	27: Falling off of Edge
	28: Falling into Lava
	29: Erase Data/Balloon
	2A: Player Stunned
	2B: Item Launched by Player
	2C: Cursor Moved
	2D: Start Pressed
	2E: Confirm Selection
	2F: Cancel Selection
	30: Shell/Bullet Bill Bounce Loud
	31: Shell/Bullet Bill Bounce Med
	32: Shell/Bullet Bill Bounce Soft
	33: ** ceh-bwoom Loud
	34: ** ceh-bwoon Med
	35: ** ceh-bwoom Soft
	36: Trophy Drop Loud
	37: Trophy Drop Med
	38: Trophy Drop Soft
	39: Item Hit Loud
	3A: Item Hit Med
	3B: Item Hit Soft (May Proto), Extra Life (kart-d)
	3C: (MC) Wall-hit 1 Loud
	3D: (MC) Wall-hit 1 Med
	3E: (MC) Wall-hit 1 Soft
	3F: (MC) Wall-hit 2
	40: Ghost Valley Wall-Hit
	41: Hit Ice Block
	42: Racer Collision
	43: Hit Pipe/Thwomp
	44: Thwomp Pound Loud
	45: Thwomp Pound Medium
	46: Thwomp Pound Soft
	47: Flattened swaying down
	48: Speed Boost
	49: Champaign Cork Pop
	4A: Cheep Cheep Balloon Deflation (May Proto), Jump/Hop (kart-d)
	4B: "Congratulations" Zoom and Bounce (Bounce only plays in kart-d)
	4C: Grow sound? (May Proto), Splash (kart-d)
	4D: MLKPT Taunt 1
	4E: MLKPT Taunt 2 (May Proto), Big Jump (kart-d)
	4F: Opponent Invincible
	50: Yoshi Taunt
	51: Bowser Taunt
	52: Item Placed
	53: Item Thrown by Non-Player
	54: Racer Collision
	55: Racer Collision Soft (May Proto), Item Selected (kart-d)
	56: Select again? (May Proto), Boo Item Steal (kart-d)
	57: Cancel again? (May Proto), Boo Item Steal Fail (kart-d)
	58: Item/Obstacle Destroy Loud
	59: Item/Obstacle Destroy Med
	5A: Item/Obstacle Destroy Soft
	5B: "Ranked Out" Bouncing Sound
	5C: DK Jr Taunt
	5D: Crush + Flattened Paper Sound (May Proto), Shrink (kart_d)
	5E: Shrink (May Proto), Silence (kart_d)
	5F: Grow (May Proto, Unused?)
        60: Silence
        61: Lightning (kart-d)
        62-63: Silence
        64: Cheep-Cheep Balloon Waddle (kart_d)
        65: Monty Mole Detach (kart-d)
        66-67: Opponent Spin-Out (kart_d)
        68: Goal (kart-d)

	80-9F: Pause Menu (Control held to silence)
- 2141: Extra Sound Effects, channel dependent
- Format is --LR SSSS, where L="play left channel", R="play right channel", S=value from table below
	0: Breaking
	1: Skidding
	2: Lakitu Warning (May Proto), Bricks Skid (kart-d)
	3: Underwater
	4: Off-Road
	5: High pitched shuffle (used for driving over grass)
	6: Bonk (used for driving over a bridge)
	7: Low pitched shuffle (used for driving over snow)
	8: Splash (used for driving on water)
	9: Spin-out
	A: Lakitu towing player
	B: Item Roulette
	C: Item Selected (May Proto), Wood Skid (kart-d)
	D: Bottom 4 Warning (May Proto), Lakitu Warning/Bottom 4 (kart-d)
	E: Item Selected (May Proto), Monty Mole Attach + Squeaks (kart-d)
	F: No Sound
- 2142: Left Channel Engine Pitch
- 2143: Right Channel Engine Pitch
14th option (EXIT)
Completely unfunctional. Routine that is activated by this does not check controller inputs, and does nothing except return.
The soft reset cheat Y + B + Start + Select can be used to go back to the titlescreen.
Unused Debug Menu Options
demo1: Internal name is "demo1", refers to an unused demo screen.
- Starts off with a screen that says "Mario Kart World Championship".
- Displays Mode7 animations of each racer spinning sequentially.
- Each screen also displays the following text, loading each line by line (Like Race Results Screen).
BENETON B191
ENGINE FORD HB SERIES V
75DEB V8 3494CC

FEATURING
GEAR BOX
 BENETTON
TIRE
 PIRELLI
GASOLINE
 MOBIL
- Luigi's sprite doesn't display correctly in kart_* and onwards. This is due to the animation being created back when Luigi used his own full body graphics. At this point in development, he shares Mario's body graphics.
- Pressing Y increases the sprite's size.
- Pressing A decreases the sprite's size.
- Pressing Select resets sprite.
- There is no limit to the sprite size, so it will flip upside down if it becomes too large.
- Animation repeats after completion.
Video footage of this in action can be found here.
Earlier Debug Menus
Nov'91 Proto Debug Menu (ED-3)
This version of the debug menu appears in the Nov'91 Prototype. It is an early version of the Debug Menu. As such, most elements from the later debug menus are missing. However, two of the debug options stayed in this menu:
- MODE7 CHAR
- COLOR MAP
There are three other options in this menu that don't seem to appear in later prototypes:
- BATTLE OBJ
- BOUND POWER
- "MARIO"
BATTLE OBJ: Value is supposed to be bounded between 00 and 01, however due to unclean RAM it will sometimes start with a different value.
- 00 - Sets the Battle Mode to "Coin Collection" mode.
- 01 - Sets the Battle Mode to "Machine-Gun Mode", as referenced in this developer interview.
As of the time of this release, the "Gate Battle" was not properly implemented, so it is inaccessible by normal means.
BOUND POWER: Represents the power at which objects are knocked back by collisions.
"MARIO": This option will load up a screen with all 8 characters' sprites loaded up at a skewed angle. Unsure at the time if anything else is supposed to happen on this screen.
Other Debugging Options
RAM Viewer / Editor Table
This mode is currently accessible in the Nov'91 prototype, May prototype, and the kart-d build.
Version 1 includes a full page of RAM viewing, with 4 groups of 8 bytes each. This version is accessed by pressing L+R+Down+Select (L+R+Select in kart-d). The selected nybble will flash, and you can move around the cursor with the D-Pad. Pressing A will increment the current nybble, and pressing Y will decrement the current nybble.
The accessible area is from address $7E:0000 to $7E:FFFF, so the upper area of WRAM is not accessible.
In the May build, it is required to start the race from the Debug Menu to get access to the RAM Viewer with the button combination. And you can only move the cursor when pausing the game.
Mini RAM Viewer / Editor
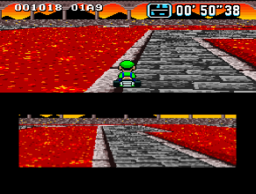
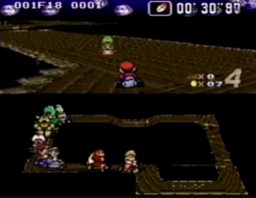
This mode is currently accessible in all builds that have the Debug Mode partition. This can briefly be seen on a Japanese Promotional video.
The left chunk shows a 24-bit address which can be adjusted to anywhere in the SNES's 24-bit address space. The right chunk shows the values at that address.
To control this version, L and R move the cursor left and right respectively, A increments the selected nybble, and Y decrements the selected nybble.
In the May build, it is required to start the race from the Debug Menu to get access to the Mini RAM Viewer with the button combination.
| February Prototype | Promotional Video |
|---|---|
(Source: February Proto) |
(Source: source needed) |
