Proto:Pokémon Gold and Silver/Spaceworld 1997 Demo/Debug Menu
This is a sub-page of Proto:Pokémon Gold and Silver/Spaceworld 1997 Demo.
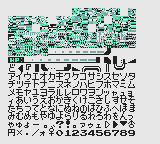
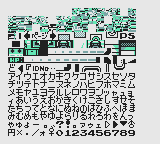
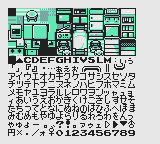
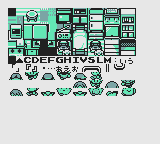
Several detailed development tools still exist, and can be accessed within two of the four prototype ROMs.
Contents
Main Debug Menu
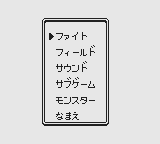
Accessed from the title screen after inputting Select, this menu allows you to access just about everything in the game.
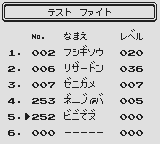
Battle (ファイト)
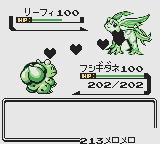
Opens an earlier iteration of the Battle Tester later seen in a debug build of Yellow, and eventually Crystal. The first screen allows you to pick up to six Pokémon that will make your roster for the fight. Any Pokémon can be selected, with the option to assign it any level between 1 and 100. Once your team is confirmed, the second screen will appear, letting you choose your opponent and encounter type. The latter can be either "フイルドモンスー" (Wild Monster) or "ディーラー" (Dealer), causing the ensuing battle to be a fight against a wild Pokémon or a Trainer battle respectively.
The controls are as follows:
- Enter resets your changes if you haven't selected at least one Pokémon that is assigned a level. Otherwise confirms your roster.
- Left / Right are used to change between the Pokémon slider and the level slider.
- Up / Down are used to change the selected entry.
- A / B are used to increment / decrement respectively.
- A is used to swap between encounter types.
- Select returns you to the main debug menu. Only works on the first screen.
| To do: Differences between this menu and the one in the Yellow debug ROM |
While extremely similar to the Crystal Battle Tester, there does however exist several differences:
- Selecting Pokémon Index 252 crashes the game as soon as you confirm your roster. In the demo, it has a nonsensical name, but in Crystal, it is known as "?????". Moreover, selecting this entry in the demo will cause graphical issues, as it tries to prompt a text box transition. On the first screen, it also causes the character graphics for the fifth and sixth entries to disappear, though they aren't actually deleted.
- Selecting Pokémon Index 253 brings up a MissingNo. with a nonsensical name and the sprite of a Pokémon Egg which crashes the game as soon as it enters battle. In Crystal, this MissingNo. is also assigned the Egg sprite, though gained its name and menu icon. It can also be battled and used in battles without any real issue.
- When choosing the encounter type, the second one is labeled "ディーラー" (Dealer) instead of "トレーナー" (Trainer).
- When "フイルドモンスー" is selected, there is no option to edit the enemy Pokémon's moveset.
- In battle, the inventory will be filled with 0 of the same garbage health item. Meanwhile, Crystal gives you 99 of each standard and health item.
- Attempting to switch moves in battle by pressing Select when choosing a move will instead activate a move debugging menu. Pressing Left / Right will decrease/increase the move index, respectively. Pressing Start will preview the move's animation being used by the player's Pokémon, while pressing Select will preview the animation from the opponent's perspective. Pressing A will allow the player to use the move.
Field (フィールド)
While this option is seemingly completely dummied-out in Crystal, it works perfectly here. Once selected, this option triggers the opening lecture shrinking animation, bringing you to your room with the in-game debug menu enabled. The Player's name will also be set to "コージ" (Kōji), after map designer Kōji Nishino, while the Rival will be named "レッド" (Red). Moreover, the Pokédex will be completely filled, the bag stuffed with a large amount of helpful items, and the Save option will be enabled.
The Player's inventory will be composed of the following items:
- The Bike.
- One of each TM from 01 to 57.
- 6 Mails.
- 30 Ultra Balls.
- 99 Poké Balls.
- 30 Potions.
- 20 Rare Candies.
- 99 Moon Stones.
- 99 Full Heals.
- 99 Proteins.
- 99 Quick Needles.
- 99 Snake Skins.
- 99 King's Rocks.
- 99 Flee Feathers.
- 99 Focus Orbs.
- 99 Sharp Scythes.
- 99 Detect Orbs.
The controls are as follows:
- B, when held down, allows the Player to run. Moreover, it also allows the Player to walk through walls, and unlike with most GameShark codes, leaving a map's boundaries will bounce you back, preventing a game crash.
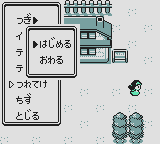
- B + Start, once inputted, displays the debug menu, which loads on the left side of the screen.
Sound (サウンド)
Opens the sound test. You can scroll through songs, with each of them being assigned a label. However, the controls for actually playing a song have been disabled.
The controls are as follows:
- Up / Down are used to change the selected entry.
- Left / Right and Select close the menu.
- A / B and Start all are not assigned any control.
Sub-Games (サブゲーム)
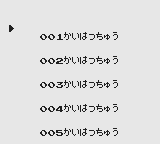
Brings you to a menu letting you choose one of five different minigames. For more information on what each one of them entails, go to the Minigames sub-page. The menu can be exited by simply hitting B.
Monsters (モンスター)
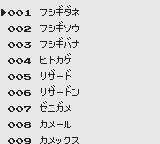
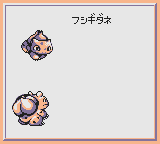
Brings you to a list which lets you view every Pokémon's front and back sprite. Unown is notably bugged in this viewer, as it displays as a garbled mess of pixels. A similar thing happens in the final games if a GameShark code is used to give yourself a full Pokédex. This is due to the first form of Unown you encounter being set in the Pokédex as the "default" one.
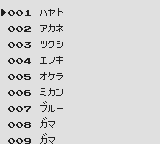
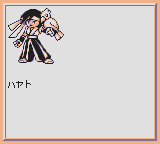
On the main list, one can also press Select to access a version of it which lists the various Trainer classes battle sprites. For more information on what each one of them entails, go to the Trainer subsection. Interestingly, the entry for the Rival reuses Gama's name in the list, but Professor Oak's name when selected. The same thing happens with the Player's entry, with it reusing Giovanni's name on the list, and then Lance's name once selected.
The controls are as follows:
- Up / Down are used to change the selected entry.
- Left / Right are used to jump 10 entries.
- A is used to select an entry.
- B is used to return to the main list, and from there to the main debug menu.
- Select is used to swap between list types.
Name (なまえ)
Opens a rather primitive iteration of the PokéGear. There, three options open themselves to you:
- The Map brings you to the region map, and displays the total play time.
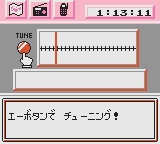
- The Radio brings you to the tuning screen. There, you can swift through four placeholder stations that lets you listen to the themes of Route 1, the trainer battles, Viridian City, and the bike.
- The Phone brings you to the phone screen. There, you are greeted with an "Out of range" status, and a text box simply stating "Darn...".
The controls are as follows:
- Left / Right are used to change the selected entry.
- A is used to select an entry and change the tune in the radio submenu.
- B is used to return to the main debug menu.
In-Game Debug Menu
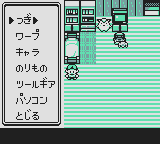
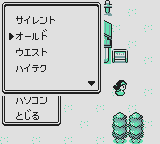
Accessed after selecting the Field option and inputting B + Start at any point during gameplay. A menu then appears on the left, split in three pages which can be flipped through by using "つぎ►" (Next►), and can be exited by using "とじる" (Close).
Page 1
Warp (ワープ)
Opens up a list of warp destinations, which can be selected by using the A button. Interestingly, there exist a handful of warp entries which are nowhere to be seen in normal gameplay. Those options can be accessed after changing the bytes at 0xFCBC0 to the following. From there, the first warp point (Silent) will be overwritten, but the Warp Menu will display normally inaccessible entries. Those unused entries, virtually all of which leading to unused interiors, are highlighted in bold in the table below:
| Offsets | |
|---|---|
| Original | 2DB6 C5B5 B650 2C02 0304 0506 0708 090A 0B0C 0D0E 0F10 1112 1314 1516 1718 191A 1B1C 1D1E 1F20 2122 2324 2526 2728 292A 2B2C 2DFF CD00 4CCD 244C 3EF4 E09A 37C9 |
| New | 2DB6 C5B5 B650 1001 0203 0405 0607 0809 0A0B 0E0F 1011 2DFF 1213 1415 1617 1819 1A1B 1C1D 1E1F 2021 2223 2425 2627 2829 2A2B 2CFF CD00 4CCD 244C 3EF4 E09A 37C9 |
| Name | Translation | Destination | Coordinates |
|---|---|---|---|
| サイレント | Silent | In front of the Player's house. | 05 05 |
| オールド | Old | In front of the Pokémon Center. | 1B 1D |
| ウエスト | West | In front of the Pokémon Center. | 19 0F |
| ハイテク | High-Tech | In front of the Pokémon Center. | 1F 0B |
| フォント | Font | In front of the Pokémon Center. | 03 0D |
| バードン | Birdon | In front of the Pokémon Center. | 0F 05 |
| ニュータイプ | Newtype | In front of the Pokémon Center. | 07 09 |
| シュガー | Sugar | In front of the Pokémon Center. | 09 0B |
| ブルーフォレスト | Blue Forest | In front of the Pokémon Center. | 0D 13 |
| スタンド | Stand | In front of the Pokémon Center. | 21 15 |
| カントー | Kanto | In front of the Pokémon Center. | 31 1F |
| プりンス | Prince | To the left of the waterfall. | 05 05 |
| フジヤマ | Mt. Fuji | Inside of the mountain wall. | 05 05 |
| サウス | South | In front of the Pokémon Center. | 21 0F |
| ノース | North | In front of the Pokémon Center. | 0D 0B |
| 15ばんどうろ | Route 15 | In front of the Pokémon Center on the route west of Newtype. | 09 0B |
| 18ばんどうろ | Route 18 | In front of the Pokémon Center on the route east of Newtype. | 0D 1D |
| はつでんしょ1 | Power Plant 1 | Beside the table. | 06 06 |
| はつでんしょ2 | Power Plant 2 | In the corner of the corridor. | 06 06 |
| はつでんしょ3 | Power Plant 3 | In front of the fencing. | 04 10 |
| はつでんしょ4 | Power Plant 4 | In between a group of metal boxes. | 06 06 |
| いせき 1 | Ruins 1 | The room entrance. | 09 0D |
| いせき 2 | Ruins 2 | Atop the slab. | 17 2F |
| はいこう1 | Abandoned Mines 1 | In the upper left corner of the room, beside the ladder. | 06 0A |
| はいこう2 | Abandoned Mines 2 | Out of bounds in the upper left corner. | 06 06 |
| はいこう3 | Abandoned Mines 3 | Out of bounds in the upper left corner. | 06 06 |
| はいこう4 | Abandoned Mines 4 | Out of bounds in the upper left corner. | 06 06 |
| はいこう5 | Abandoned Mines 5 | On top of the elevated rock walls. | 06 06 |
| はいこう6 | Abandoned Mines 6 | Inside a rock in the upper left corner. | 06 06 |
| はいこう7 | Abandoned Mines 7 | Inside a rock in the upper left corner. | 06 06 |
| アジト 1 | Hideout 1 | The room entrance. | 10 0D |
| アジト 2 | Hideout 2 | Inside machinery in the upper left corner. | 08 08 |
| アジト 3 | Hideout 3 | Inside bookshelves in the upper left corner. | 08 08 |
| ヤドンの いど1 | Slowpoke Well 1 | The center of the room. | 09 OB |
| ヤドンの いど2 | Slowpoke Well 2 | The room entrance. | 09 23 |
| ポケモンりーぐ1 | Pokémon League 1 | Beside the Gym Leader (Old City). | 06 06 |
| ポケモンりーぐ1 | Pokémon League 1 | Beside the Gym Leader (West). | 06 06 |
| ポケモンりーぐ2 | Pokémon League 2 | In front of the platform leading to the Gym Leader (High-Tech). | 06 06 |
| ポケモンりーぐ3 | Pokémon League 3 | Inside a rock in the middle of the room (Birdon). | 06 06 |
| ポケモンりーぐ4 | Pokémon League 4 | Beside the Gym Leader (Newtype). | 06 06 |
| ポケモンりーぐ5 | Pokémon League 5 | Inside a tomb in the middle of the room (Blue Forest). | 06 06 |
| ポケモンりーぐ6 | Pokémon League 6 | Beside the Gym Leader (Stand). | 06 06 |
| ポケモンりーぐ7 | Pokémon League 7 | Beside the Gym Leader (North-West Kanto). | 06 06 |
| ポケモンりーぐ7 | Pokémon League 7 | Beside the Gym Leader (South-East Kanto). | 06 06 |
| しずかなおか | Silent Hill | The end portion of the forest between Silent and Old. | 10 10 |
Chara (キャラ)
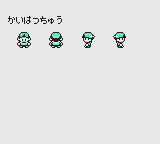
Allows you to look at all of the game's overworld sprites, though sadly they are all assigned the placeholder label "Currently in development". Pressing any directional button while viewing a sprite will cause it to enter its walk cycle. Pressing A when a character sprite is selected will trigger a message asking you if you want to select it, and confirming will spawn them in the overworld as a character following you. Some sprites without animation frames, such as the Pokémon Center nurses, will display incorrect tiles when animated. Others, like the Poké Ball, /item icon, will not change at all.
Some entries also lack proper graphics at all, resulting in the game falling back on the next valid set of sprites. For example, sprites 25-35 are empty, and selecting them makes the game display the sprites meant for the male Cooltrainer. It was then impossible to discern the identities of these missing sprites until their internal names were revealed in the source code leak.
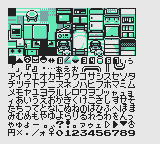
Spot 89, as it turns out, is worth mentioning, as it reuses the static sprite for the Generation I Link Cable receptionist, but its front walking frame is a corrupted sprite of the female Silph Co. worker. On the menu, its side and back sprite will also be reused from the last character you selected, with it defaulting to the Player sprites if none have been selected before. Moreover, in-game, its back and side sprites, both static and animated, are a square composed of four characters making up "ケコサシ". This is due to the sprites not being assigned to any proper data, instead pulling from the character font; thus, we would end up with something like "IJKL" using the international character encoding.
| # | Internal Name | Identity | Notes |
|---|---|---|---|
| 1 | HERO | Player (Walk) | Has animated directional sprites. |
| 2 | BICYCLE | Player (Bike) | Has animated directional sprites. |
| 3 | SKATING | Player (Skateboard) | Has animated directional sprites. |
| 4 | RIVAL | Rival | Has animated directional sprites. |
| 5 | OOKIDO | Professor Oak | Has animated directional sprites. |
| 6 | RED | Red | Has animated directional sprites. |
| 7 | GREEN | Blue | Has animated directional sprites. |
| 8 | MASAKI | Bill | Has animated directional sprites. |
| 9 | FUJI | Mr. Fuji | Has animated directional sprites. |
| 10 | SAKAKI | Giovanni | Has animated directional sprites. |
| 11 | GANTETU | Kurt | Has animated directional sprites. |
| 12 | MAMA | Player's Mother | Has animated directional sprites. |
| 13 | SISTER | Rival's Sister | Has animated directional sprites. |
| 14 | BROTHER | Ken | Lacks any sort of sprites. |
| 15 | ONEMAMA | Red's Mother | Has animated directional sprites. |
| 16 | NANAMI | Daisy | Has animated directional sprites. |
| 17 | NISE | Imposter Oak | Has animated directional sprites. |
| 18 | KIKUKO | Agatha | Has animated directional sprites. |
| 19 | HAYATO | Falkner | Lacks animated directional sprites (defaults to the 21 sprites). |
| 20 | AKANE | Whitney | Lacks any sort of sprites. |
| 21 | TSUKUSHI | Bugsy | Lacks animated directional sprites (defaults to the 22 sprites). |
| 22 | ENOKI | Morty | Lacks animated directional sprites (defaults to the 24 sprites). |
| 23 | OKERA | Okera | Lacks any sort of sprites. |
| 24 | MIKAN | Jasmine | Has animated directional sprites. |
| 25 | GAMA | Gama | Lacks any sort of sprites. |
| 26 | BLUE | Blue | Lacks any sort of sprites. |
| 27 | KATUTO | Katsuto | Lacks any sort of sprites. |
| 28 | KANNA | Lorelei | Lacks any sort of sprites. |
| 29 | SHIBA | Bruno | Lacks any sort of sprites. |
| 30 | KASUMI | Misty | Lacks any sort of sprites. |
| 31 | WATARU | Lance | Lacks any sort of sprites. |
| 32 | WISEMA | N/A | Lacks any sort of sprites. |
| 33 | WISEMB | N/A | Lacks any sort of sprites. |
| 34 | WISEW | N/A | Lacks any sort of sprites. |
| 35 | BOSS | N/A | Lacks any sort of sprites. |
| 36 | TRAUNERM | Cooltrainer♂ | Has animated directional sprites. |
| 37 | TRAUNERW | Cooltrainer♀ | Has animated directional sprites. |
| 38 | LITTLEB | Bug Catcher | Has animated directional sprites. |
| 39 | LITTLEG | Twins | Has animated directional sprites. |
| 40 | BOY | Youngster | Has animated directional sprites. |
| 41 | GIRL | Lass | Has animated directional sprites. |
| 42 | WOMANA | Teacher (Female) | Has animated directional sprites. |
| 43 | WOMANB | Beauty | Has a different design that bears a strong resemblance to the Rival. Has animated directional sprites. |
| 44 | MANA | Super Nerd | Also used by Poké Maniacs. Has animated directional sprites. |
| 45 | MANB | Guitarist | Has animated directional sprites. |
| 46 | MIDDLEM | Pokéfan (Male) | Has animated directional sprites. |
| 47 | MIDDLEW | Pokéfan (Female) | Has animated directional sprites. |
| 48 | OLDMAN | Grand-Father | Has animated directional sprites. |
| 49 | OLDWOMAN | Grand-Mother | Has animated directional sprites. |
| 50 | SWIMERM | Swimmer (Male) | Has animated directional sprites. |
| 51 | SWIMERW | Swimmer (Female) | Has animated directional sprites. |
| 52 | SITTINGM | N/A | Lacks any sort of sprites. Uses sprite 54 by default. |
| 53 | SITTINGW | N/A | Lacks any sort of sprites. Uses sprite 54 by default. |
| 54 | ROCKETM | Rocket (Male) | Has animated directional sprites. |
| 55 | ROCKETW | Rocket (Female) | Has animated directional sprites. |
| 56 | PCWOMAN | Nurse | Has animated directional sprites. |
| 57 | PCCABLE | Link Receptionist | Has animated directional sprites. |
| 58 | SHOPMAN | Clerk | Has animated directional sprites. |
| 59 | BIGMAN | Fisher | Has animated directional sprites. |
| 60 | FISHING | Fishing Guru | Has animated directional sprites. |
| 61 | ASSISTM | Scientist | Has animated directional sprites. |
| 62 | ITAKO | Medium | Has animated directional sprites. |
| 63 | BOUZU | Sage | Has animated directional sprites. |
| 64 | BADMAN | Delinquent | Has animated directional sprites. |
| 65 | GENTLE | Gentleman | Has animated directional sprites. |
| 66 | FIGHTER | Blackbelt | Has animated directional sprites. |
| 67 | COUNTERW | Receptionist | Has animated directional sprites. |
| 68 | COUNTERM | Officer | Has animated directional sprites. |
| 69 | GERUGEM | Geruge Member (Male) | Lacks any sort of sprites. Uses sprite 71 by default. |
| 70 | GERUGEW | Geruge Member (Female) | Lacks any sort of sprites. Uses sprite 71 by default. |
| 71 | CAPTAIN | S.S. Anne Captain | Lacks animated directional sprites (flickers). |
| 72 | YANKEE | Mohawk | Sprite used by Tamers, Jugglers, and Lt. Surge in Gen I. Has animated directional sprites. |
| 73 | MEGANE | Gym Guide | Has animated directional sprites. |
| 74 | SAILOR | Sailor | Has animated directional sprites. |
| 75 | DRIVER | Biker | Has animated directional sprites. |
| 76 | GLASSES | Burglar | Has animated directional sprites. |
| 77 | MONSTER | Monster Pokémon | Has animated directional sprites. |
| 78 | MARUMON | Cute Pokémon | Has animated directional sprites. |
| 79 | BIRD | Avian Pokémon | Has animated directional sprites. |
| 80 | DRAGON | Dragon Pokémon | Has animated directional sprites. |
| 81 | KABIGON | Snorlax | Static sprite. |
| 82 | UMIMON | Aquatic Pokémon | Has animated directional sprites. |
| 83 | NYOROBON | Poliwhirl | Has animated directional sprites. |
| 84 | RAPLUS | Lapras | Has animated directional sprites. |
| 85 | CAPSULE | Poké Ball | Static sprite. |
| 86 | BOOK | Pokédex | Static sprite. |
| 87 | LETTER | Paper Sheet | Static sprite. |
| 88 | TREE | Tree | Lacks any sort of sprites. |
| 89 | OLDPC | Gen I Link Receptionist (broken) | Technically has animated directional sprites. |
| 90 | EGG | Egg | Static sprite. |
| 91 | IWA | Boulder | Static sprite. |
Transportation (のりもの)
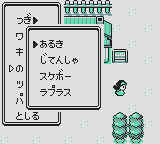
Allows you to choose between four movement types:
- Walking (あるき). Self-explanatory.
- Biking (じてんしゃ). Interesting, as it can be used even when indoors, and doesn't allow the Player to travel any faster than walking speed.
- Skateboarding (スケボー). Ignores collision and map boundaries. Only moves properly as long as B is held down. Also uses the same speed as walking.
- Surfing (ラプラス). Can normally only be used when next to a body of water, but it can be taken out of it as long as B is held down.
Toolgear (ツールギア)
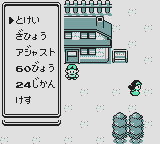
Opens up several options which are almost all related to the passing of time.
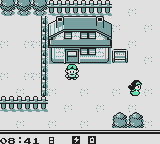
- とけい (Clock). Will show the current time on a small HUD at the bottom of the screen. The day system is not yet properly implemented, however, as the time will keep increasing in the 24s after 11:59 pm.
- ざひょう (Coordinates). Will show your current coordinates at the bottom of the screen.
- アジャスト (Adjust). An actually functional version of the time adjuster menu. Has proper time limits (24 hours and 60 minutes) unless this menu is accessed after attempting to force a day transition by waiting for midnight to arrive. From there, the menu will allow you to select up to 99 minutes and 99 hours, though inputting an incorrect time will convert it into a proper one. Also worth noting is that with an "incorrect" timer the number list actually wraps around, letting you go from 0 to 99 by pressing Right.
- 60びょう (60 Seconds). Causes a day-to-night-to-darkness transition every 60 seconds.
- 24じかん (24 Hours). Resets the proper overworld time palette if the 60 Seconds option had previously been used.
- けす (Erase). Removes the time HUD at the bottom.
PC (パソコン)
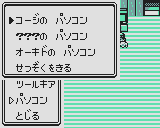
Lets you access the PC from anywhere. From there, four options open themselves:
- <PLAYER>の パソコン (<PLAYER>'s PC). Your PC, which is used to store items. From here, you can either withdraw, deposit, or toss items. Interestingly, the Player starts off with a Repel in their PC, as opposed to a Potion as one would expect.
- ???の パソコン (???'s PC). Bill's PC, which is used to store Pokémon. From here, you can either see the status of deposited Pokémon, withdraw, deposit, or release a Pokémon, or change the box. Interestingly, the Player starts off with three random Pokémon in their PC, all at level 5.
- オーキドの パソコン (Oak's PC). Not yet implemented, as selecting this option will display a message stating that the line is jammed.
- せつぞくをきる (Disconnect). Exits the menu.
Page 2
Shop (ショップ)
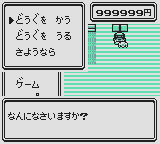
Opens the shop menu, from which three options open themselves to you:
- どうぐを かう (Buying Items). Brings up an earlier iteration of the Generation II shop menu, which is identical to final aside from lacking the area in the top right corner of the screen which displays how much money the Player has. Actually trying to buy items is not yet implemented, instead bringing up a message saying that this option is still under development.
- どうぐを うる (Selling Items). Not yet implemented, instead bringing up a message saying that this option is still under development.
- さようなら (Goodbye). Exits the menu.
The items listed in the shop menu are as follow:
| Item | Price | |
|---|---|---|
| つきのいし | Moon Stone | 0 |
| どくけし | Antidote | 100 |
| やけどなおし | Burn Heal | 250 |
| まんたんのくすり | Max Potion | 2500 |
| すごいキズぐすり | Hyper Potion | 1200 |
| いいキズぐすり | Super Potion | 700 |
| キズぐすり | Potion | 300 |
Recover (かいふく)
Instantly heals your Pokémon.
Experimental (じっけん)
Opens the PokéGear option from the main debug menu.
Game (ゲーム)
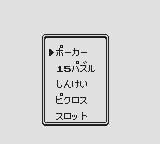
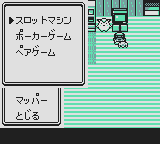
Similar to the subgame menu accessible from the main debug menu, this lets you play three subgames: Slots, Poker, and the Matching game. Interestingly, there is a fourth, blank slot that cannot be selected, which is where Picross would have logically gone.
Mapper (マッパー)
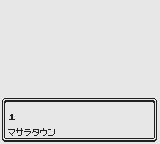
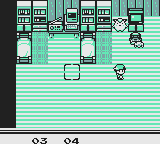
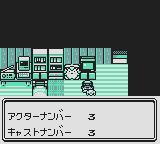
Allows you to view objects and coordinates for the current map that you are on. Pressing A on an object will display its table details, and, in the case of an NPC, will display its actor and cast numbers. Pressing Start on either an object or actor will trigger a message asking you if you would like to leave map viewer mode.
Page 3
Event (イベント)
Opens up a menu with two options: フラグを クリア (Clear Flag) and フラグを うめる (Set Flag). Neither options appear to actually do anything, as selecting either one will simply close the menu. Using this menu in an area without flags (i.e. one outside of the demo’s boundaries) will display a message stating that this map's sequence isn't recorded.
Test (テスト)
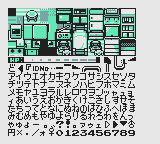
VRAM viewer. Lets you see all the tiles loaded for the map you are on, as well as the overworld sprites. Can be scrolled through by using Left and Right.
Telepo! (テレポ!)
When used in a map which features a Pokémon Center, this option will set this area as the destination for when you use Teleport.
Follow (つれてけ)
Opens the follow menu, from which two options open themselves to you:
- はじまる (Start). Triggers a short sequence where the Player follows an NPC with glitched graphics around in a circle, occasionally hopping about. The NPC is a square composed of four characters making up "チツテト". This is due to the sprites not being assigned to any proper data, instead pulling from the character font; thus, we would end up with something like "QRST" using the international character encoding. This sequence ignores map boundaries, making it possible to crash the game. It also stops if the player happens to cross a loading zone.
- おわる (End). Normally does nothing. However, the debug menu can be opened while following, and selecting this option while so will stop the following sequence. Interestingly, trying to trigger another follow afterward will only give you a message stating that "You can't do this when you have a Pokémon." This confirms that this debug option was used to test out the "follow me" cutscene seen at the start of the game, when trying to leave town when you do not have any Pokémon on hand.
Map (ちず)
Lets you see the region map. You can move a bird Pokémon's sprite around like in the Fly menu, although pressing A will just take you back to the main menu. Interestingly, Prince, despite being a town, is labeled as a "place of interest", whereas Mt. Fuji is oddly listed as a town. To add onto that confusion, Prince is the only "place of interest" which can be be selected on the region map.
Unused Debug Functions
A set of unused debug functions which can be accessed after changing the bytes at 0xFC0D0 to 0002 0508 0C0E FF07 0D0F 1213 1415 17FF. From there, the first two pages of the Field Debug Menu will display normally inaccessible entries.
Page 1
Reset (リセット)
Triggers a dialogue box asking you if you would like to confirm your choice, which lets you choose between Yes and No. Selecting Yes brings you back to the title screen.
Frames (わくせん)
Brings up a menu which lets you choose between eight frame types. These frames are all identical to the ones seen in the final games.
Cell (セル)
Brings up a menu which lets you choose between three overworld tilesets.
- Cell 1 is the default tileset.
- Cell 2 is the Old tileset.
- Cell 3 is the High-Tech tileset.
Name (なまえ)
Brings up a menu which lets you rename the Player. This menu is the same as the one used during the story mode intro when manually giving a name to the Player.
Link (つうしん)
Triggers the dialogue spoken by the Link Cable receptionist. Once all the dialogue boxes have been read, the game then crashes.
Animation (アニメ)
When used inside the Rival's house, the elevator sound will play, followed by the Rival's sister moving similarly to the Follow option, even jumping over the wall that separates the living room and the kitchen. Everywhere else, it triggers a dialogue box which states "No, not here!" instead, and nothing happens afterward.
Page 2
Take Me (つれてく)
Triggers a dialogue box which lets you choose between two options, Add (つける) and Remove (はずす). Selecting "Add" spawns a copy of the Player sprite for a split second in the upper left corner of the map you are currently on. Going through a loading zone will corrupt the Player graphics and then crash the game. Strangely enough, enabling this option will cause the game to act as if you had previously canceled the follow sequence from the Follow menu. Selecting "Remove" after enabling "Add" will cancel the whole process, letting the Player go as usual.
Mow (くさかリ)
Can only be selected when standing in tall grass. If this option is used when in a grass patch, said patch will be cut down and replaced by standard grass, which is a secondary use for the Cut HM that existed all the way up to Generation III.
Tile (あしもと)
Displays the number of the tile you are currently standing on.
Automatic (じどう)
When used on Route 1, the Player will be transported to coordinates 09 09, which is right in front of the Silent Hills loading zone. When used in any other location, nothing will happen aside from a message appearing, with it stating that this option can only be used on Route 1. This option is actually a bit broken, as using it on Route 1's vertical map axis 0 to 4 (anything to the left of the cuttable tree) will cause the Player to be transported backwards, causing them to actually enter the loading zone, and then once in Silent Hills to leave the map boundaries, crashing the game.
Movement (うごき)
Triggers a dialogue box which lets you choose between two options, Stop (とめる) and Move (うごかす). The first option stops a moving NPC, while the second one, unsurprisingly, returns them to their set path as it makes them move again.
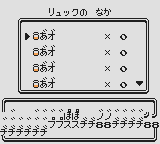
Items (アイテム)
Crashes the game unceremoniously, due to the game attempting to read incorrectly-formatted menu data. Another bug is present where the game crashes when tossing the item, due to the game calling the "toss item" text string instead of loading it as an argument to the "display text box" function. It is however possible to fix both of these issues and restore this option by overwriting the following bytes:
| Hex | Old Offsets | New Offsets |
|---|---|---|
| 0xFD14B | 09 CD 74 47 09 CD 83 47 09 EF 41 | 09 74 47 09 83 47 09 EF 41 EF 41 |
| 0xFD16B | 09 CD 74 47 09 CD 83 47 09 EF 41 | 09 74 47 09 83 47 09 EF 41 EF 41 |
| 0xFD2A2 | CD D4 52 | 21 D4 52 |
| 0xFD2B0 | CD 4C 1C 37 C9 | E1 CD 4C 1C C9 |
| 1997 B-Roll | 1997 Demo (Debug) | 1997 Demo (Standard) |
|---|---|---|
|
|
|
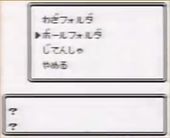
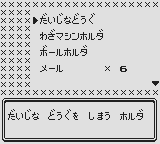
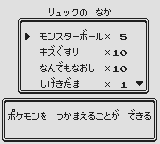
Once the patches have been applied, using this option will simply open the Player's inventory, except using an partially broken earlier layout reminiscent of the one seen in 1997 B-roll footage. Namely, the upper window is more to the right, the different pockets lack their icons, and the bag itself has no name. Some behavior differences can also be noted when compared to the standard in-game menu:
- Attempting to use either the Key Item, Ball, or TM holders will bring the "Use/Toss" options instead of just opening the submenu. Selecting "Use" will trigger Oak's usual disapproving message, and trying to choose "Toss" will bring up the message seen when attempting to throw away a Key item. This leaves the Ball and TM holders inaccessible.
- The Key Item pocket can still be accessed using the Left or Right directional pads, like in the normal demo, but strangely enough the Bike is nowhere to be seen inside, the "Cancel" option lacks the two hyphens on its sides, and is positioned like the "Cancel" on the main menu. Trying to select the "Item" (どうぐ) option will also prompt a puzzling message stating that you "Can't use the PC." instead of simply returning the player to the main item listing.
- Items can't be rearranged by using Select.
- The "Sel" option used to register an item is missing completely.
- Attempting to use some items which usually triggers Oak's warning will refresh the screen once the message is done.
- Attempting to use a health item on a Pokémon and then cancelling to return to the menu will cause mild graphical issues. Namely, either the Player or Pokémon menu sprite will appear on the item menu after backing out, with the top scrolling arrow replaced by the right half of the HP graphic in the case of the menu sprite. The overworld palette will occasionally glitch out as well, becoming monochromatic in certain spots, and yellow/green in others, and the Player's sprite will also be replaced with that of a Pokémon icon.
