Proto:Persona 5/December 4th, 2015/Areas
This is a sub-page of Proto:Persona 5/December 4th, 2015.
| To do: *Add more fields |
The areas on this page are divided into the following categories:
- Removed fields - areas with IDs that don't exist in future builds, or where the model is missing
- Changed fields - areas that have been found in future builds, but have different contents (irregardless of if the field is used or unused)
Categories are decided using the field list provided by Amicitia.
Contents
- 1 Removed fields
- 2 Changed fields
- 2.1 Yongen-jaya Station Exit (009_001)
- 2.2 Kamoshida's Palace - Unused Removed Torture Chamber Area + Miscellaneous Differences
- 2.3 Madarame's Palace - Unused Fake Path Wall Paintings + Miscellaneous Differences
- 2.4 Kaneshiro's Palace - Scrapped Pipe Room + Miscellaneous Differences
- 2.5 Futaba's Palace - Different Entrance + Nearby Town Unused Rooftop Segment
- 2.6 Okumura's Palace - Unused leftover shortcut + Extended/changed fields
- 2.7 Sae's Palace - Different Entrance, Extended Dice Game Area, and Poker Field Entrance
- 2.8 Shido's Palace - Elevated Pool + Double-Length Mid Port Hallway
- 2.9 Mementos Depths - Entire Palace
Removed fields
Miyashita Park (001_007)


A small, mostly untextured map with a road, some stairs and a stretch of ground with some benches that was included in the retail version of the game, albeit missing its model. The map has two stretched images along the back perimeter wall - one of some trees and the other of a park area. The wall next to the road has the text (仮) みやした公園 入り口 meaning "(Temporary) Miyashita Park Entrance" on it, whereas the back wall after the stairs has みやした公園仮マップ (Miyashita Park Temporary Map) superimposed on the image.
Untextured NPCs spawn in the park itself if the player walks against the back wall, although two of these clip through a bench. The road outside doesn't spawn traffic, although some textured NPCs sometimes appear. Exiting the map places the player in the station at Shibuya Square.
Yan Quijote discount store (010_014)


Found within the Small Rooms fields, a store parodying Japan's famous Don Quijote discount chain - complete with its own Donpen-like mascot (or should that be Yanpen?). The map itself has rows of product shelves huddled together in one part of the room, as well as T-posing untextured NPC models dotted amongst them. Although no store mechanics exist within the field, its assumed that the store would have a fixed camera and a shop menu, possibly selling discount items or costumes.
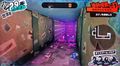
Madarame's Scrapped Art Warehouse Field
| To do: Replace Images with higher quality PNG ones. Find internal field name. |
As seen in developer interview footage, there was a removed section of Madarame's palace that featured crane controls that slid paintings along a track in a puzzle-like fashion. Additionally, there were texture banks found in the final game that references an unused elevator in Madarame's palace. Both of these are found on the deleted field in this build - fully intact!
Some of the objects in this field would later go on to be used in Persona 5 Royal for the redesigned field with the second will seed, and a redesigned sliver of the 1st exhibition room accessible via grappling hook, making the concept of this area recycled in that version of the game, albeit on a much smaller scale.
This massive deleted field can be accessed from the out of bounds area on field three below. That area has a staircase, and when it is ran up, it loads directly in to the art warehouse field.
The field starts the player out along a hallway that is textured differently from anything else seen in the palace. Additionally, there are doors seen here that are never seen in the final game. The door immediately to the left when entering this field is a safe room that shares the same safe room ID as the one on field three, so exiting the safe room will load the player back in front of the second fake path wall painting that cannot be passed normally.
The opening at the end of the hallway takes the player to an area with ceiling glass panes shining light down. To the left side are two more restrooms that can be entered and contain objects.
To the right side is another hallway that opens up with shadows walking throughout. To the left of this is a gate that has a shadow guarding a treasure chest.
If the player hops up on the wall, they can walk outside the window onto a window sill overlooking an expansive outdoor section showing a parking lot and a side of Madarame's palace unlike anything seen in the final game.
If the player walks to the right, they hop down in another similar area, but then they can hop back up on the other side to continue walking along the windows. At the end, there is one more open window that drops the player into the real art warehouse. To progress, the player needs to enter a vent to the left to go through to another area. This area features treasure chests and stealable objects.
After opening a couple doors, the player's progress is halted with sliding paintings that are in the way. After clipping through these, the following massive room can be interacted with. It contains treasure chests with key items necessary for operating the painting controls.
After opening all painting walls, the player can still not progress and clipping into the rest of the unexplored section is necessary. This takes the player to the last few sections of this field, ending in a shutter/elevator with unique animations never seen anywhere else in the final game! After Joker presses the elevator button, the shutter opens up, and the light inside slowly flickers on, an effect also never seen anywhere else.
It then cuts to all Phantom Thieves currently in the party in the elevator with the shutter now closing.
Interestingly enough, the elevator drops the player off into the void right behind the safe room on field three mentioned below. It seems as though the field is accessed in reverse order, and it's possible that instead of the safe room being there on field three, there would have been this elevator instead. Remnants of a short hallway are evident here, as there are two remaining hiding spots Joker can interact with along with a stealable object, and if this scrapped field is completed in reverse order - elevator first, that would make more sense, as the crane controls seem to open the way to earlier parts of the field and allowing the player to progress through the field without issue. This is also backed up by the fact that in the room after the vent, there is a short scripted scene with Ryuji thinking they've reached "another" dead end, but Ann and Joker point out there's a draft coming from a vent, meaning that the staircase at the beginning is actually supposed to be the very end of this field, and the out of bounds area it connects to on field three was likely the original way the player was intended to get around the fake path wall painting mentioned below. It is unknown why this field was scrapped given how it is essentially complete and fully functional. In the end, it looks as though Atlus scrapped the idea of this field the moment they scrapped the idea of the unused fake path painting objects, likely in a build slightly before this one since the final safe room is already in place.
 | This image needs to be replaced. Please read the image guidelines for more information. |

The out of bounds area on the previous map with full collision. Stairs take you to the deleted art warehouse field.

Another angle of the out of bounds area on the previous map.

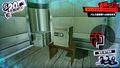
First initial view of the art warehouse map. Near a deleted safe room.

A view of the deleted safe room to the left side.
The next big room. Has an overlook. Benches can be seen at the bottom.

Another angle of the big room showing ceiling glass panes and a bathroom nearby.

A view of the door to the next room from the big area.

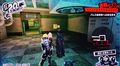
View immediately after opening door. An open window can be seen and a gated area with a shadow and a treasure. The open window can be used to access the treasure.

Another view of the shadow and treasure chest.

A shot of the way the player is supposed to access the treasure chest

Inside of shadow and treasure chest room.

Inside of shadow and treasure chest room - Another angle.

Zoom out of windows and outside of Madarame's palace. Parking lot is visible.

Climbing up to the second open window

In the opening of the second open window

Outside of the windows

Another view of the parking lot

The next room with a chest and a locked door

Opening chest. All chests on this field have items and function correctly.

Outside again after opening chest

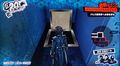
Jump down into the next room to access the art warehouse

The immediate inside of the art warehouse

Another angle of the initial art warehouse room with the vent the player needs to crawl through
Crawling through to the next room

Outside of the vent and in the next room

View of the door to the room after this

This room extends to the right and contains a treasure chest and stealable item

Closer view of the stealable item

View of the treasure chest by the stealable item

Another angle of chest/item room

Immediately after opening door to next room

Progress is halted by the painting blockade. (Or maybe we weren't supposed to start from this side!)

View after clipping through the paintings

Another angle of big art warehouse room with chest that contains key item
A shot of the first accessible crane control from the right side

Opened path after dealing with crane controls

Shot of next area with another crane control

Another crane control
After clipping through the paintings in the way, we see the crane control that was shown off in the developer interview!
After the green crane control was flipped the path opens, meaning that this field was supposed to START with the elevator

One more area with shadows before the elevator

The infamous elevator in all its glory!
Joker opening the elevator

The elevator drops you off in the void behind the safe room on field three.

Another shot of where the elevator was supposed to connect to field three!


Sae's Scrapped Poker Field
| To do: Replace Images with higher quality PNG ones. Find internal field name. |
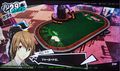
In the final game, there are references to an unused poker event. In this build, the poker event and the room it takes place in are both fully intact. They can be accessed from Sae's treasure room in the area where there's normally a wall. In this build, it's a small hallway and door blocked by a pair of hands holding cards. See the changed fields section below. Upon clipping through the cards and entering the door, the poker event and this field can be accessed. There's nothing to do here after the poker event is over, however. Presumably, players would have been required to view this scene before being able to fight Sae from the elevator access on the previous map.
| This image needs to be replaced. Please read the image guidelines for more information. |

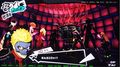
Start of poker event. Uses real-world Sae portraits instead of Shadow Sae.

Poker Event
Poker Event

Poker Event
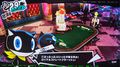
Poker Event

The field right after the poker event is complete

Another view of the poker event field


Changed fields
Yongen-jaya Station Exit (009_001)
The field is named 四軒茶屋駅前地上出口 (Yongen-jaya Station Ground Exit) and consists of a main road with buildings down each side, although the road cannot be crossed so only the left side can be explored. This field was likely to have been an extension to the Yongen-jaya backstreets area, before being downgraded to an exit scene (loading the field without the Field Viewer's 'no leave' option shows the player walking out of the subway before loading into 009_002, which is the current Yongen-jaya field), and then being scrapped entirely.
It's unknown whether the interactable buildings down the left side of the main path are purely just for show, or whether they would have additional functionality (i.e. acted as shops or activities), but these include:
- A karaoke bar
- Mobile phone store
- Konbini (no model, popup only)
- Ticket reseller shop
- Nameplate shop
- Cram school
- Pachinko parlour
- Drug store (invisible, but with a working shop menu)
- Cinema
Across the road, there are more buildings that contain either real or mimic brands, including a 24-hr McDonalds, a Chiyoda shoe shop and a giant Tatsuya book store (possibly related to Tsutaya). A static image of this field is also used in field 013_005 (referred to as 'Traffic Light'), with a recreation of the street corner with a traffic light, subway exit and crash barrier.
Kamoshida's Palace - Unused Removed Torture Chamber Area + Miscellaneous Differences
| To do: Replace Images with higher quality PNG ones. Find internal field names. |
Kamoshida's palace has an extended area attached to the unused side of the torture chamber area that isn't present in later builds. Clipping here by modifying Joker's coordinates reveals this part of the unused section of the field actually has full working collision and climbable cliffs. The end of this section ends in an open metal gate/void, indicating it potentially connected to the other scrapped Kamoshida's palace dungeon fields before being removed entirely.
All female body statues in Kamoshida's palace have blue undergarments in this build rather than hot pink in the final game.
The square staircase field towards the end of the palace with Kamoshida statues that track the camera's movement has six barred off doors that the player cannot normally enter. Clipping the camera into these rooms in this build reveals the unused girls on a bed object fully in tact.
This same field also contains an unreachable locked treasure chest that cannot be opened without modifying coordinates.
| This image needs to be replaced. Please read the image guidelines for more information. |

Unused Section Past Torture Chamber Area View 1

Unused Section Past Torture Chamber Area View 2

Unused Section Past Torture Chamber Area View 3

Unused Section Past Torture Chamber Area View 4
Unused Section Past Torture Chamber Area View 5

Unused Section Past Torture Chamber Area View 6

Unused Section Past Torture Chamber Area View 7

Unused girls on a bed object

Unreachable locked treasure chest

Girl statue with blue undergarments


Madarame's Palace - Unused Fake Path Wall Paintings + Miscellaneous Differences
| To do: Replace Images with higher quality PNG ones. Find internal field names. |
Madarame's palace field three right after the laser/treasure demon segment includes fake path wall painting objects that are never seen again after this build, the second of which completely halts the player's progress in this palace with no discernible way past it (outside of the scrapped missing out of bounds elevator leading to the scrapped Art Warehouse field mentioned above).
On the same field three, there is a completely unused area out of bounds that was removed from the out of bounds area in future builds. Clipping here and walking up the stairs will load the scrapped Art Warehouse field, revealing that it's the intended exit of the Art Warehouse field.
Field four (Central Garden) has a slightly different map. The area near the safe room looks closer to a full square separated by a thin wall, even though the actual field geometry is finalized already and doesn't match up to this map. This indicates at one point the pond/plant area near the safe room on this field was intended to be a centered square that the player could run around on either side. This is backed up by the fact that an earlier layout of field four exists in the backdrop of field five, even in the final game. If the camera is taken out of bounds on the Treasure Hall Lounge field, it can be seen that the pond was intended to be a square instead of going all the way to the wall.
Field five of Madarame's palace (Treasure Hall Lounge with the laser grid and room that introduces entering paintings) almost completely lacks lasers in the shadow area other than three of them.
Field six of Madarame's palace (Treasure Hall Gallery) has a few noteworthy differences. First of all, the buttons that activate the paintings are completely different. Secondly, the sinking boat painting with the octopus attacking it appears to be on fire on the left side, something that is absent in the final game. Lastly, there are two inaccessible hallways on both the left and right sides at the bottom, blocked off by the metal beam platforms. Each hallway contains one shadow.
Lastly, Madarame's treasure isn't hidden with a cloud effect, it is the Sayuri painting just sitting there. Notably, the fake Sayuri, which is censored differently than it is in the final game. In the final game, it's blended in to naturally look like a misty cloud of smoke, whereas in this build it's just a giant purple splotch of paint across the bottom. Later in the game after this arc, Yusuke gives Sojiro this same fake textured Sayuri to hang up in Leblanc, which indicates the look of the real painting hadn't yet been finalized by this point in development.
Additionally, the catwalk/crane part of the treasure room utilizes two scrapped locked dynamic camera angles, an ongoing trend in Futaba's Palace and Okumura's Palace as well.
| This image needs to be replaced. Please read the image guidelines for more information. |

First fake painting wall object

Backside of first fake painting wall object
Second fake painting wall object

Backside of second fake painting wall object

Unused out of bounds area

Missing a lot of lasers in the fifth field laser area

Treasure Hall Gallery overview with different buttons/hallway
Another blocked off hallway on the right side of Treasure Hall Gallery

Sinking boat painting on fire

Fake Sayuri treasure


There are a couple more oddities in Madarame's palace, such as an unused vent system with full collision just like Kaneshiro's palace. While this is still left over in the final, here it utilizes an extra-wide vent grate instead of the standard ones seen in the final game. This vent system seems to indicate that the Phantom Thieves were initially going to attempt to access the treasure room from the security room, or at least get a view of it from the vent.

Scrapped Vent in Security Room

Angle showing vent connecting security to treasure room
Angle inside the vent

Angle outside the vent within the treasure room


Over by the end of field three, the player can view a laser grid just out of bounds on the second floor. It is possible that this would've been the exit connecting a long hallway to the out of bounds exit of the Art Warehouse Field, completing the way the player would've gotten around the fake path painting objects. Additional out of bounds images show evidence that the safe room on this map would've been a hallway leading to the Art Warehouse Field elevator. There is credence to this theory as there are also two more unused out of bounds hiding spots on the other side of this laser grid. Pressing the action prompt puts Joker in a hiding position as if there were a hallway corner here intersecting the with the treasure chest balcony hallway.
Lastly, on field one, the other half across the shutters that the player never normally accesses has full collision in this build whereas none of it has collision in the final game. There is also an interestingly-textured picture frame unlike anything seen in the final. This may indicate this side of the field was intended to be explorable at an earlier point in development. This area would later go on to be explorable in the version of Madarame's palace seen in Persona 5 X.
Out of bounds laser

Out of bounds laser in relation to out of bounds Art Warehouse field exit

Proof that the hallway to the elevator was wider than the space the safe room occupies
Joker in one of the two elevator hallway hiding spot remnants
Inaccessible side of field one featuring a yellow-gold frame. Area has fully working collision.


Kaneshiro's Palace - Scrapped Pipe Room + Miscellaneous Differences
| To do: Replace Images with higher quality PNG ones. Find internal name of field |
Kaneshiro's palace is very close to what it is in the final game, as is Futaba's palace, with very minor differences.
One noteworthy difference of Kaneshiro's palace are these scrapped restroom doors throughout the second field, reminiscent of the restrooms in Madarame's palace, although these ones are just doors that the player cannot interact with and there are no explorable areas behind them. This may indicate at one point they intended to have explorable restrooms just like Madarame's palace before scrapping the idea altogether.
| This image needs to be replaced. Please read the image guidelines for more information. |

Set of bathroom doors

Set of bathroom doors

Set of bathroom doors

Set of bathroom doors


The elevator that comes down from field three to four is on the other part of the wall next to where it is in the final game. In this same area nearby, there is a giant pile of money next to some plants on the railing absent from the final game.

Elevator on different wall on field four

Field four pile of money


On field two, there is a hallway and blocked off staircase that was removed from the final game. This either was intended to connect to a scrapped field, or it was going to be the shortcut back to field one before it was moved to the other side of this field.
Scrapped Hall/Stairs

Scrapped Hall/Stairs

Scrapped Hall/Stairs


On the giant safe cylinder field, the number pad uses a basic-looking early model. The letters/key items needed for finding out the code of these number pads are in basic-looking safes rather than piggy bank looking safes used in the final.
The last few maps of this palace have gold bars on racks instead of stacks of money in the final game.

Old numpad
Old safe

Gold Stacks


There is a scrapped vent system on field one, connecting from where the outside shortcut is to where the hallway on the first visit is. This unused vent system still exists in the final game, but due to how the final game handles rendering areas that are out of view, it's hard to get a good look at it in the final. It has full collision both here and in the final game albeit with no prompt to enter or exit. A similar unused vent system exists in Madarame's palace. Interestingly, even though it's technically there in the final game, there is a hole in the wall where the vent grate would be in the final game. The shortcut was likely scrapped when they decided they never want the player to be able to access this area again after the first time entering Kaneshiro's palace.

Scrapped vent system by outside shortcut

A unique part of this vent system are the windows to the left looking into Kaneshiro's bank

Joker walking in the vent system (with flag checked to put him in crouching state)

Exit to the vent system


The most noteworthy part of Kaneshiro's palace in this build are the scrapped areas on the first field in the area where the Phantom Thieves visit the bank for the first time.
The map shows originally instead of there being two doors, they would've entered from the door on the left side that is permanently locked in the final game. The current geometry has two doors, though, and the player is required to go through the door on the right.
If the player clips out of bounds and follows the door to the left, they'll see that rather than ending in an L-shaped hall and looping back to the right door as in the final, the hallway keeps going back more to reveal... one of the unused doors from Madarame's palace's scrapped Art Warehouse field. While this could mean Kaneshiro's palace was built off remnants of Madarame's palace, it could be more likely that this is just a generic door model that they used in palaces until they got around to making unique-looking doors for the palaces, and this one was left behind in this build.

Different map for the first time hallway area on field 1

Door straight out of the scrapped Art Warehouse Field in Madarame's Palace


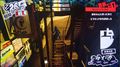
Lastly, there is this unused pipe room at the back of field 1 with an open hatch that definitely looks like it would've connected to another field, yet it does nothing in this build. Rather than the hallway ending abruptly as it does in the final game, it keeps going to the left, and the player opens another door to this hallway. To the left there is a door that cannot be opened, but to the right down the hall is this room that is absent from this field in future builds. It has full collision outside of the boxes on the wall that appear like they would've done something, but the player cannot interact with them. This pipe room features a fully animated exhaust fan.

Zoom out of pipe room and connected hallway
Joker standing inside the pipe room
Joker standing in front of the open hatch


Futaba's Palace - Different Entrance + Nearby Town Unused Rooftop Segment
| To do: Replace Images with higher quality PNG ones. Find internal name of field |
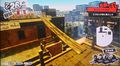
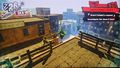
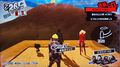
As seen in the prerelease screenshots in Dengeki Playstation Volume 599 from September 2015, Futaba's palace had a scrapped rooftop segment in the nearby town which is present in the fields of this build. It features a wood plank connecting two rooftops that the Phantom Thieves would be able to walk across, and as there is no exit from the other rooftop, it likely would've been either for a treasure chest (as can be seen on the one accessible rooftop that made it to the final game), or to spy on the bandit shadow during the segment where you need to chase him into the alley.
Based on the incomplete, fully whited-out map, it looks as though the out of bounds area behind this building was intended to be a playable area.
By clipping out of bounds and over to this area, it is revealed that it has full properly working collision (with the exception of an invisible wall at the top of the first roof and the fire escape causing characters to slowly slip off the stairs.) It otherwise is a fully explorable area. The brick wall blocking it off has collision, the nearby buildings have collision, the fire escape has collision, both rooftops have collision, and the plank in between them does, too.
Another subtle difference about the field in this build is that it appears to be an earlier time of day, looking more like 12pm-1pm rather than the 4pm-5pm late afternoon look in the final game.
| This image needs to be replaced. Please read the image guidelines for more information. |

Original Dengeki Magazine Image
This area without characters
This area unexplorable in the final game

The brick wall blocking this deleted area off

Walking down the slope on the other side of the brick wall

Approaching the fire escape

Closer to the fire escape
Walked up the first landing on the fire escape

Walked up the second landing on the fire escape

Zoom out of the third landing on the fire escape

At the very top of the fire escape
Entering the first roof

Clipped past the invisible wall

Walking onto the plank

Recreation of the Dengeki 599 screenshot

Walked onto the second roof from the plank


Additionally, Futaba's palace has a different entrance than what is normally seen in the final game. Rather than a set of stairs going up to the front door, there are four ledges that the player must climb to make their way up to the door. As they do so, there's a locked dynamic camera that was scrapped in the final, and when they reach the top, it switches to another scrapped dynamic camera. The immediate inside of the palace is different. Instead of stairs on either side as in the final, there's a single climbable ledge on the right side.
The exit of the palace was moved in the final game to the mirage dock, but in this build and the February build, it's on the platform above the sand slide. This explains why this area is seemingly pointless in the final game when it originally did have a point in these earlier builds.
The Velvet Room door has been moved from near the entrance door/ledges to closer to the mirage dock in the final game, likely due to the change in palace exit location.
There's a button in the area where Futaba talks to her shadow self on the Chamber of Emptiness field. It cannot be interacted with, however.
A couple of miscellaneous differences in this palace are that there's floating cracked tablets instead of the idle ones used in the final. These share the same animation as the (also scrapped) lock/key/chain object from Mementos Depths.
On the final field there's giant sitting statues. In the final game, these statues are surrounded by scaffolding, but it's completely absent in this build.

Different Entrance

Different Entrance
Different Entrance

Different Entrance
Different Exit Location

Different Inside

Floating Tablet Object

Statues missing scaffolding


Okumura's Palace - Unused leftover shortcut + Extended/changed fields
| To do: Replace Images with higher quality PNG ones. Find internal field names |
Okumura's palace also has a few changes to map layouts and shortcuts. One of the first notable things is the third safe room is actually located where it is in Persona 5 Royal rather than where it is located in the final version of vanilla Persona 5. There is a door blocked off by a laser that seems it would be where the safe room should be, though clipping over to it and opening it reveals it probably wasn't intended to ever be opened unless it's a remnant of an even earlier layout.
| This image needs to be replaced. Please read the image guidelines for more information. |

Scrapped door that opens up to nothing

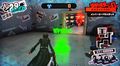
In the third trailer of Persona 5, PV03, there is a spinning disc shortcut revealed to be on the second field (at 1:58 in this video https://www.youtube.com/watch?v=wvpOwQaqRXA). This footage is from a build even earlier than this one since the map in PV03 even has the shortcut disc on it, but the field geometry already matches what is seen in the final game in this build. However, there is remnant code of the shortcut still remaining in this build, and it is still functional even if the model for it is absent. If the player makes it to the very end of this open section past all of the floating robots on the third field, there is a "check" prompt that pops up in the very center of the disc at the end. When pressing circle, even though the shortcut is missing the model for the platform, it lifts the party up into the air and slides them off screen. It then slides back into the second field with the party on top of a spinning disc and takes them right to where the platform would've been in PV03, indicating that the shortcut was axed at some point shortly before this build. This shortcut can still be seen in the final game from field 1 and field 3 of this palace if the player clips out of bounds.

Disc model seems to be missing from field three entirely, even by safe room
Scrapped shortcut in action
Scrapped shortcut in action

Scrapped shortcut in action

Scrapped shortcut in action

Scrapped shortcut in action


Some miscellaneous differences in this build are that the cranes in the fourth field are not yet color-coded blue, purple, and yellow. The fifth field contains giant lock-looking objects that Joker can hide behind instead of giant cubes as seen in the final. The "lunch break" terminals haven't been created yet in this build, so in their place the game reuses the crane control terminals instead. Some boxes have a placeholder texture on them, and fields three and five have broken loading zones to the next field, so it is impossible to make it to the next field via normal means. Thankfully, the saves in this build are compatible with the February build saves and the final Japanese version saves. The Disposal Line field has many lasers that the player can accidentally run into as opposed to having no lasers in this section in the final (other than the one by the lunch break terminal).

Cranes lacking color coding

Giant "lock" objects

Crane terminals in place of lunch break terminals

Placeholder texture on boxes

Broken loading zone in field 5 (Production Line)

Lasers in the Disposal Line


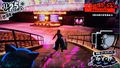
Rather than Disposal Line ending with an elevator going downwards after seeing the robots being disposed of, it keeps going. Rather than loading the next field right as the player goes down the elevator, the elevator reaches the very bottom, and the player is taken to this small area that features a few stealable objects and an interactable Big Bang Burger logo terminal. Pressing action on the prompt shuts the machine off, but it doesn't seem to do anything otherwise. Presumably, it would've halted the workers/robots being melted down in the machine above. The true door to the next field is on the wall exactly opposite of this terminal, which opens up to another elevator going upwards. All of this was scrapped in the final game. There is no terminal left, no collision, no stealable objects, and no door. There is, however, a piece of ground on the other side of the wall where the elevator used to be, but that is the sole indicator that there was ever an explorable area here.

Initial view after going down the elevator

Another angle of the area

Another angle of the area

The Big Bang Burger terminal

The original elevator at the end of this field


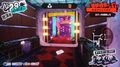
The airlock sections have a few differences. The most immediate one is there is text "Rest Room" over the first door you see. Either this means this was intended to be the safe room instead of the door to the left, or Okumura's palace would have had a literal restroom similar to how Madarame's does. On the other side, there is another door with the text "Teleport" and walking through it reveals another elevator. This one is unfortunately non-functional, however, though it may have connected to a deleted field at one point. On the last airlock field, upon opening the elevator, it reveals a bunch of deactivated robots/employees.

"Rest Room" on first airlock field

Removed elevator in "Teleport" room

Robots in elevator


The last big differences in Okumura's palace are the fields for Weapon Production and Weapon Maintenance.
Weapon Production is very unfinished, as nearly the entire field uses the same texture. It lacks lighting and is devoid of any objects. Okumura's space ship is lacking the Big Bang Burger shutter in front of it. Instead of the drawbridge being up, a laser grid prevents the player from continuing, even though there's no floor to walk on regardless. Instead of glass railing, this section is either lacking railing entirely or has fully metal railing. There are two locked dynamic cameras used here that are never used in the final game. The first of which is when the player is crossing the beam in front of the space ship, and the next is the platform immediately after that. This field ends in a bizarre-looking door that isn't like anything seen in the final.

Empty Weapon Production

View of space ship without shutter

Locked dynamic camera 1

Locked dynamic camera 2
A door unlike anything seen in the final


Weapon Maintenance received probably one of the biggest layout changes of anything seen in this palace. Rather than starting with a long L-shaped hallway as in the final, it loads right in to the main chunk. The player in the final version of this field simply hops a few gaps and then goes up an elevator to the disc shortcut directly leading to the Okumura boss fight, but this early version is exceptionally different. There is no hallway, the player starts out in the open area. There is a square hallway to the left ending in a little dead end, and there is another area to the right with a single enemy that also is a dead end. The player hops over the beams similar to the final, but there is no elevator. Instead, the player then needs to turn left and jump down a short pipe. There is then this long winding square staircase to the left that the player then needs to run up all the way to get to the Okumura Boss Fight shortcut.

Map of original Weapon Maintenance
Initial view of Weapon Maintenance

Another angle of Weapon Maintenance

Weapon Maintenance Dead End

Running down the pipe

Looking at the winding square staircase

View at the top of the staircase


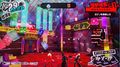
Sae's Palace - Different Entrance, Extended Dice Game Area, and Poker Field Entrance
| To do: Replace Images with higher quality PNG ones. Find internal field names |
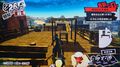
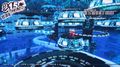
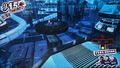
In this build, there are many noteworthy differences in Sae's palace from the final game, the first of which is immediately apparent. The entire casino entrance is different. It takes place much higher in the sky between two buildings with a fire escape, scaffolding, and ledges along a path of windows. The noteworthy part of this is that this original entrance isn't entirely unused in the final game, either. It was changed to be the backdrop in front of the final casino entrance. If the player clips up to it in future builds (including the final game), they can see a hole in the building to the right where the door at the top of the fire escape was. In the later builds, all collision, fire escape, scaffolding, balcony, and climbable window ledges were removed, and the time of day was made sunset instead of night, but the area itself is nearly identical to what's seen in this build, meaning that the final game's entrance was built from this field as a base.
After reaching the door at the end of the window ledges, the player enters the palace normally, though the door on the next field may have initially been on the wall to the left of where it is based on how the cast walks into the next scene.
| This image needs to be replaced. Please read the image guidelines for more information. |

Initial scene upon loading into Sae's palace for the first time

Original entrance angle 1

Original entrance angle 2
Original entrance angle 3

Original entrance angle 5

Door that loads into the main part of the palace

Original entrance angle that cannot normally be seen

Same area in future builds on the finalized entrance

Hole in the right building where the fire escape door used to be

Joker standing in this area in the final game/later builds


The Dice Game Area has a huge scrapped chunk of map that isn't seen in the final game. It ends in a wall although the map makes it apparent it was supposed to connect directly to the final part of the map that was actually used.

Unused Part of Dice Game Area
Unused Part of Dice Game Area

Unused Part of Dice Game Area

Unused Part of Dice Game Area

Unused Part of Dice Game Area

Unused Part of Dice Game Area

Unused Part of Dice Game Area
Unused Part of Dice Game Area

Unused Part of Dice Game Area
Unused Part of Dice Game Area

Unused Part of Dice Game Area

Unused Part of Dice Game Area

Ends in a wall, but the map shows it was going to connect to the rest of the area

What's left of the dice game area that actually made it to the final game

Another angle showing the gap between the parts of the map

The field after this is mostly as it is in the final outside of one chunk of connected map within the wall


There are some miscellaneous differences as well. All vents in this palace are very wide compared to the ones used in the final game. This is true for some earlier palaces in this build as well, but it is most apparent in Sae's palace.
On the second field where obtaining a members pass is necessary to use the elevator for the first time, there is a green animated arrow object with a 3D render of the word "Event" above it. It can be interacted with, and the message it pops up with roughly translates simply to "forced battle", which is true about the battle immediately ahead of this object.
The elevator mentions that the members area is floors "11F-50F". The floors that the members floor and high limit floor take place on are never specified in the final game.
On the members floor, the slot room is paywalled with a 5000 chip requirement. It even has a chip payment terminal such as the one needed to lower Sae's bridge on the high limit floor. This was later changed to a rule board in later builds with nothing stopping the player from attempting to tackle the slot room field before the dice game field. Additionally, the doors that the player goes through to enter the slot room and dice game area are flipped from what they are in later builds. The map also makes it seem as though there used to be a door where the members floor prize counter is.
After the event where the player reaches the high limit floor for the first time and need to leave to see Sae in court to lower the round wall, they have the option to stay and look around. Doing so in the final game has no repercussions, but choosing to do so in this build will punish the player if the player walks a few feet. A shadow will pop up roughly stating that the player doesn't have the authorization to be on this floor, and they will forcibly remove them. This then starts a battle.
The House of Darkness field isn't dark in this build, appearing how it normally does after the player finishes the area in the final game. Additionally, the door at the very end on the next field works as a direct shortcut back to the door at the beginning of the House of Darkness, whereas in future builds and the final game they're two independent safe rooms.
One more quirk about this build is when leaving the "VIP Floor" (High Limit Floor) safe room, it spawns the player within the prize counter of the high limit floor, which along with the missing door shown on the map, indicates the safe room was originally on this side of the room where the prize counter was rather than being behind the elevator.

Extra wide vents throughout the entire palace
"Event" object used for debugging purposes

5000 chip requirement for the slot room

Being forcibly removed from the high limit floor

It seems the high limit floor safe room was originally going to be where the prize counter is


Sae's treasure room has the missing hallway and door that was referenced in the collision of the final game. The door is guarded by giant paper hands holding playing cards. Clipping through and entering this door takes the player to the scrapped poker event field.

Initial view of treasure room

Angle of hands holding playing cards

Another angle of scrapped hallway


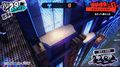
Shido's Palace - Elevated Pool + Double-Length Mid Port Hallway
| To do: Find internal names of fields. Replace Images with higher quality PNG ones. |
Shido's palace is very broken and barren in this build of the game. Progressing through it required debugging exploits. Almost no safe rooms in this palace work correctly other than the first one (similar to half of the safe rooms in Sae's palace), the first rat puzzle segment cannot be completed normally as the switch to turn off the rattled effect has no collision and no functional prompt, so it was necessary to clip out of bounds just to open a door in a non-rat state to access the next field.
The corridors in this build use a purple carpet texture rather than a yellow-golden one seen in the final.
In the pool area, unlike the final game, the pool is elevated higher with two ramps going up to it on either side.
The changing room has not been implemented yet. There's no vent shortcut to it underneath the stairs, and opening the door to it reveals an empty void.
On the second pool field and the gambling hall field, there's no regular door to continue, and the way to the next fields are the doors that are actually supposed to take you to the safe rooms.
The mid port hallway (final rat puzzle with 12 squares in the final game) is actually doubled to 24 squares in this build and split up into two separate fields.
The engine room cannot be accessed in this build, at least not via normal means.
| This image needs to be replaced. Please read the image guidelines for more information. |

Elevated Pool

Elevated Pool

Elevated Pool
Elevated Pool

No change room shortcut

No change room

Other side of the pool

Early map doesn't match up to geometry at all

The most broken rat puzzle map, as the way through is nonsensical

Barren gaming hall

No door to the next field where it normally is

Double-Length mid port hallway

Gap with a missing hall in mid port hallway


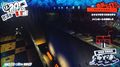
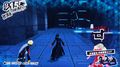
Mementos Depths - Entire Palace
| To do: Find internal names of all Mementos Depths fields used in this build. Replace Images with higher quality PNG ones. |
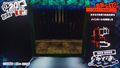
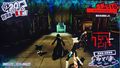
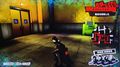
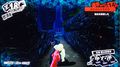
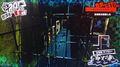
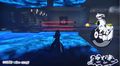
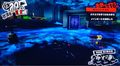
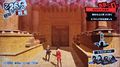
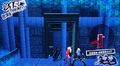
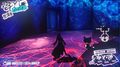
Mementos Depths's layout is drastically different from later builds, appearing much more maze-like and more like an underground prison than the open feel of the builds after this. There are no puzzles, the entire palace is enclosed in walls, and the palace almost completely lacks interactable objects. That is to say, every playable field that encompasses Mementos Depths is very different both mechanically and visually. The miniboss segments are relegated to their own individual fields rather than being part of a bigger field.
The blue/yellow light puzzles do not yet exist in this build.
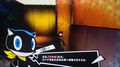
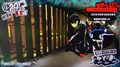
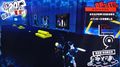
There is an unused keyhole/cog/chain object used on the second from last field that never appears in the final game. It has a unique floating animation that is never seen anywhere else (other than the floating tablet objects in Futaba's palace in this build, but even those were also scrapped in favor of ones that sit idly in the final game). There are only three of these objects in the entire palace, all three of which are on this field. Futaba mentions needing a key in order to access the areas behind them, but there are no keys to be found.
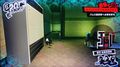
There are multiple linear curved fields that are similar to the Mementos Depths Entrance, being the stand-ins for the fields where Morgana drives the team further down in the final game.
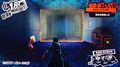
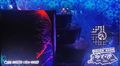
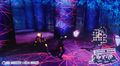
The final field is another standalone miniboss field area. What separates this from the others is rather than ending in a door, it ends in a big red light aura. Having events active and entering this aura takes the party directly to the first Holy Grail Battle.
| This image needs to be replaced. Please read the image guidelines for more information. |

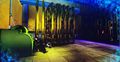
Unused Hanging Cage Over Bottomless Pit

Unused Light Staircase at the end of first field

Complete map of first field

Cage missing textures above second field miniboss area

Third field. Resembles Mementos Depths entrance

Big open area in fourth field with enemies

Jump down area towards end of fourth field

Unused Cog/Lock/Chain Object

Another lock object blocking off one of the only two chests in this palace

Scripted boss fight that doesn't appear in the final game
One of the only parts that resembles the final game on the first field

Second part that resembles the final game
Immediate start to the first field

First chunk of first field is a prison-like maze

Optional area towards end of first field with powerful shadow

Jumpable crevice different from any in the final game
Another angle of prison maze on first field

Jump down area at the end of second to last field

Final miniboss area directly before the Holy Grail
Start of the Holy Grail event/battle immediately after entering the red aura


