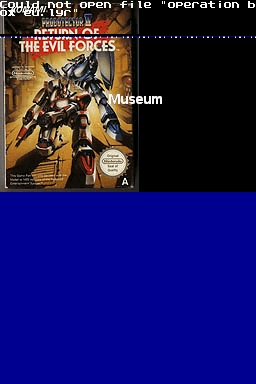
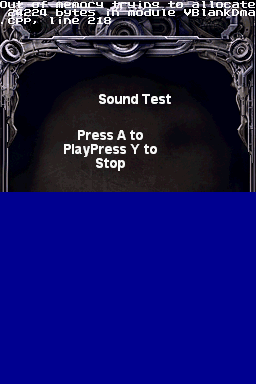
Proto:Contra 4/June 27th, 2007 build
This is a sub-page of Proto:Contra 4.
The Contra 4 prototype dates from two months before the game was completed for the US. Most notably, this build claims that the game was going to be released in Europe, which the final game was not. This build is very similar to this July 11 build.
To do:
|
| This page or section needs more images. There's a whole lotta words here, but not enough pictures. Please fix this. |
Contents
- 1 Internal Header Data
- 2 General Differences
- 3 Audio
- 4 Debugging Features
- 5 Game Menu
- 6 General Graphical Differences
- 7 General Gameplay Differences
- 8 Weapons
- 9 Enemies & Bosses
- 10 Arcade Mode
- 11 Challenge Mode
- 11.1 Mutt Hunt Challenges
- 11.2 Pacifism Challenges
- 11.3 Low Ammo Challenges
- 11.4 Gunplay Challenges
- 11.5 Speed Run Challenges
- 11.6 Accuracy Challenges
- 11.7 Friendly Fire Challenges
- 11.8 Rematch Challenges
- 11.9 Challenge 1 (Mutt Hunt)
- 11.10 Challenge 2 (Mutt Hunt)
- 11.11 Challenge 3 (Mutt Hunt)
- 11.12 Challenge 4 (Mutt Hunt)
- 11.13 Challenge 5 (Low Ammo)
- 11.14 Challenge 6 (Low Ammo)
- 11.15 Challenge 7 (Low Ammo)
- 11.16 Challenge 8 (Pacifism)
- 11.17 Challenge 9 (Low Ammo)
- 11.18 Challenge 10 (Pacifism)
- 11.19 Challenge 11 (Pacifism)
- 11.20 Challenge 12 (Bad Guy Blitz)
- 11.21 Challenge 13 (Bad Guy Blitz)
- 11.22 Challenge 14 (Pacifism)
- 11.23 Challenge 15 (Bad Guy Blitz)
- 11.24 Challenge 16 (Bad Guy Blitz)
- 11.25 Challenge 17 (Bad Guy Blitz)
- 11.26 Challenge 18 (Accuracy)
- 11.27 Challenge 19 (Bad Guy Blitz)
- 11.28 Challenge 20 (Accuracy)
- 11.29 Challenge 21 (Accuracy)
- 11.30 Challenge 22 (Speed Run)
- 11.31 Challenge 23 (unknown)
- 11.32 Challenge 24 (Accuracy)
- 11.33 Challenge 25 (unknown)
- 11.34 Challenge 26 (Speed Run)
- 11.35 Challenge 27 (unknown)
- 11.36 Challenge 28 (Gunplay)
- 11.37 Challenge 29 (Speed Run)
- 11.38 Challenge 30 (Gunplay)
- 11.39 Challenge 31 (Gunplay)
- 11.40 Challenge 32 (Friendly Fire)
- 11.41 Challenge 33 (Friendly Fire)
- 11.42 Challenge 34 (Gunplay)
- 11.43 Challenge 35 (Friendly Fire)
- 11.44 Challenge 36 (unknown, possibly Friendly Fire)
- 11.45 Challenge 37 (Rematch)
- 11.46 Challenge 38 (Rematch)
- 11.47 Challenge 39 (Rematch)
- 11.48 Challenge 40 (Rematch)
- 12 Bugs
Internal Header Data
The internal ROM header gives the game title as "TITLE NAME", while the game serial (AIPE) and the publisher code (52 = Activision) correspond to Barbie in the 12 Dancing Princesses, another WayFoward Nintendo DS game.
| Proto | Final |
|---|---|
Wayforward Tech. Contra™ Konami |
Contra 4 Konami Digital Entertainment |
General Differences
- Konami and Wayforward logos appear twice on startup.
- Pressing most buttons speed up these screen fade transitions
- Intro sequence is presented as rough storyboard sketches
- Rather humorous title screen, consisting of a crudely cut out "Contra" from the original arcade cabinet's artwork, on a black background.
- No attract/rolling demos
- Several message/prompt and other text differences throughout the game
- No ending
- Greater tendency to lag during gameplay, especially in the 3D stages
Audio
- No character voice-over
- Music doesn't play in-game, but music data is present. Differences in all of the tracks
- Several missing or different sound effects
- Some sound effects that don't play during gameplay are still found and working from the sound test menu.
Debugging Features
Debug Menu
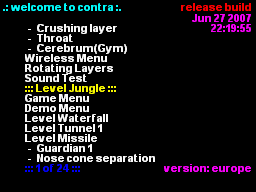
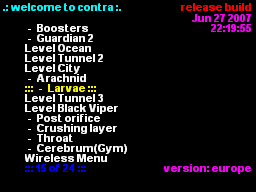
The prototype boots into this menu.
- Selecting any level or level segment from this menu starts you with 99 lives. The count resets back up to 99 when reaching the next stage.
Notable entries are:
Game Menu
The main menu.
Demo Menu
The opening and closing screens of the DS Download Play demo.
- Cerebrum(Gym)
This is actually the final boss, although set to a level using the same tileset as the GYM entry in the final's debug menu. Like the " - Throat" level, the game hangs after defeating the boss as the end hasn't been added at this point.
Wireless Menu
| To do: This needs documenting by someone that can use the wireless function (two DS consoles). |
A wireless debug menu.
Rotating Layers
A rotating layer test.
Other Debug Menu Options
- Sound Test: One of the Bonus Features selections from the Game Menu.
- These are the stages and stage sections accessible from the debug menu:
- Level Jungle: Jungle
- Level Waterfall: Laboratory
- Level Tunnel 1: Base
- Level Missile: Harbor
- - Guardian 1: At the Missile Hugger 3000 sub-boss battle
- - Nose Cone Separation: After the above sub-boss
- - Boosters: Segment where you dodge the missile flames
- - Guardian 2: Just before the stage boss
- Level Ocean: Ocean
- Level Tunnel 2: Factory
- Level City: City
- Arachnid: At the large arachnid sub-boss
- Larvae: Just before the stage boss
- Level Tunnel 3: Alien Hive
- Level Black Viper: Harvest Yard
- - Post Orifice: Atop the first climb into Black Viper
- - Crushing Layer: At the start of the climb before the crushing ceilings
- - Throat: At the start of the climb before the bone slits
- - Cerebrum (Gym): See above
Other Debug Features
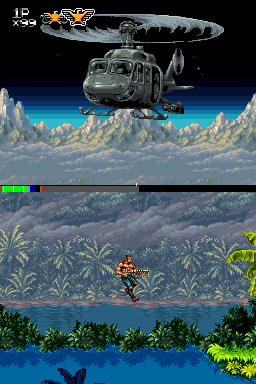
- The bar beneath the Top Screen shows... something. Probably the amount of CPU used.
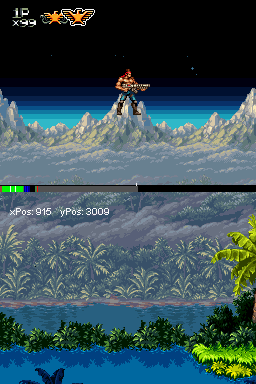
- Pressing L + R while playing a level straight from the debug menu will make the player sprite able to be moved completely around the screen, and the current coordinates of the sprite to be shown in the top-left corner of the Touch Screen. Any shots fired like this will be shot vertically, no matter which direction you face. This does not work for levels accessed from the end of another level (e.g., Waterfall level from Jungle level).
- Pressing Select while in a level changes the currently equipped gun. This is likely the "magic button" that was mentioned in the aforementioned July build video.
Wireless Menu
- Named Wireless Debuge Menu on the screen
- These are the menu options from here:
- Level Jungle
- Level Waterfall
- Level City
- Level Ocean
- Level Missile
- Missile – Guardian
- Missile – Guardian2
- Black Viper
- Black Viper Cerebrum
- Test Tunnel
- Appears to be a barebones test/debugging 3D stage. No gameplay, and nothing on the screen except for a simple tunnel projection with light, solid colors for the walls, floor and ceiling.
- Tunnel1
- Tunnel2
- Tunnel3
Game Menu
- Pressing B in the main menu brings the player back to the intro sequence; in the final, it goes to the title screen.
- Menu decorations animate constantly here (whereas once in the final).
- Menu options have slight differences: selection order, label text, what options are available.
- There is touch screen functionality in the menus.
- 1/2 players and difficulty selections are swapped in the Arcade Mode menu in the final.
- Easy mode is highlighted by default here (Normal mode in the final).
- One of the options is Game Sharing, which isn't in the final.
- Menu sections display as subtitles, instead of name plates.
- Menu navigation/selections don't play a sound when you're first in the menu
- Different game start sound effect
- You can select the starting lives count in the Options menu (whereas it's determined by the selected difficulty setting in the final).
- Secrets and unlockables are already accessible.
- "Emulated Games" are for the NES Contra and Super C emulation. No aspect ratio options, the emulation is more buggy and you can't leave the games, so you must restart the system.
- Incomplete Museum feature: Misaligned images, repeating and unordered images (and of incorrect sizes), misaligned and incorrect text, some entries crash the game.
- The showcased screenshots and the order of games presented are also different. The most interesting aspect here is that it displays the PAL localizations where applicable. The NA release showed NA localization photos or ordered them first; likewise with the JP localization. This prototype doing similarly, but for PAL releases, further supports the idea that it was indeed intended for EU/AU, making it a cancelled localization.
- Some entries do appear locked/hidden, although if there are actually any images or not (and how to unlock them if so) is unknown.
- The comic books are incomplete, and have some minor differences with transition, display, sound, etc.
- The sound test contains several differences: sound effect order, names (given specific names here, whereas they have a generic designation in the final), missing and cut sounds.
- As mentioned before, the music tracks don't work in-game.
- The interview contains some on-the-nose placeholder text.
Character Select
- Called Player Select in this prototype.
- Although similar to the final game, there are quite a few differences.
| Proto | Final |
|---|---|
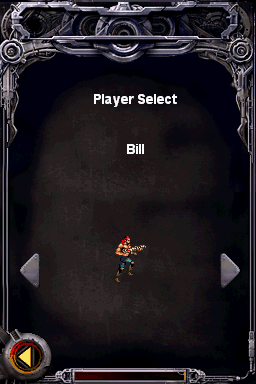 |
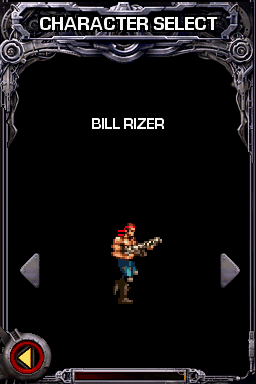 |
- Most notably, the preview of the character shows the sprite's normal size, whereas the final uses a scaled-up version. Like the menus before it, it also does not feature any music or character voices, which were added for the final.
| Proto | Final |
|---|---|
Bill Scorpion Mad Dog Lance Jimbo Sully Lucia Sheena Probotector Goldenrod |
BILL RIZER LANCE BEAN MAD DOG SCORPION JIMBO SULLY LUCIA SHEENA ETRANZI PROBOTECTOR |
- All of the character names are spelled entirely in uppercase in the final character select screen, with Bill, Lance and Sheena now listed with their full names. The order is a bit different as well, as Lance and Scorpion were swapped out. The only character who was "cut" from the final roster was Goldenrod, who wasn't so much of a character as he was an alternate set of palettes for Probotector (similar to the four default characters, as well as Jimbo and Sully). Goldenrod's palettes were simply made into additional palette options for Probotector. However, Goldenrod is still loaded by default in the final's debug menu.
- All bonus characters are already unlocked
- Different character selection controls/setup
- If you choose a character that is unlocked in the final, enter and exit Arcade Mode, then return to the character select, their attire will be changed to one of the secret ones.
- No sound plays when scrolling through the characters, but does when pressing Up/Down.
- Some characters have different default attires, as well as button associations for the secret attires.
General Graphical Differences
- Missing diagonal aiming sprites while hanging on a rail. The character appears to aim directly up or down.
- The character's firing animation is not adjusted according to their gun's firing rate when the fire button is held down. No matter the weapon, holding down fire animates like you have the machine gun.
- Player character death animation in the 3D stages are the same as in the side view stages
- Different, more rudimentary pause menu.
- A slightly different variation (in colors) of the pause menu is seen during the Ocean and most of the Harbor stage. Near the end of the latter stage, it reverts back to the primary variant.
- They might have originally intended to display your high score in the pause menu, since it displays there in the prototype.
- Intermission sequences are crude in design; stages 3, 6 and 8 share the one for the Jungle stage.
- Different game over screen
- Selecting Continue freezes the game immediately; Quit hangs the game on a black screen.
- After defeating many of the stage bosses, it simply fades to black and transitions to the intermission screen. In the final, there is always a sequence of the player running to the right to leave the stage.
General Gameplay Differences
- Controls tend to be unresponsive and stiff. Certain movements are restricted if some directional buttons are already being pressed.
- Slower grappling speed
- Easy mode does not automatically upgrade gun powerups
- Both Konami code cheats don't work
- No extra lives through points
- No data is saved (level progress, unlocked items, settings, selected character, etc.) when resetting or powering off
Weapons
- Most powerup locations are different.
- Powerup falcon pickups mostly don't disappear.
- The falcon icons don't properly display the current weapon.
- No sound for swapping between your weapons
- Press Select to cycle through all of the game's weapons,
- When you drop a powerup weapon, it doesn't matter if you were upgraded. You drop just 1 falcon and revert to the Normal gun, losing the upgrade.
- The upgraded Crush missile sprite is that of the V homing missile prototype weapon.
- The classic Laser prototype weapon is silent and not autofire (when holding down the fire button).
- The V homing prototype weapon is pretty crazy. Oddly, it uses the Homing missile sprites (even though the miniature ship sprites are evidently present, allocated to the upgraded Crush missile). The firing rate is extremely high when you hold down the fire button, comparable to the Machine gun (your falcon icon even sometimes displays the M falcon). Similar to the Spread gun in NES Contra and Super Contra, the spread formation and number of homing missiles fired from the gun breaks down and decreases as more missiles are on the screen (likely to prevent lag).
- In the 3D stages, several guns have different projectile sprites, while the laser is a non-functional, constant beam with a loud, droning noise.
Enemies & Bosses
- Different enemy & boss hit points across the difficulties
- Different sounds for some enemies
- Some slightly different enemy behaviors
- Different enemy spawn/spawn patterns
Arcade Mode
- The screen wipe effect transition doesn't occur when starting a game through this menu option; it only occurs when choosing the levels/segments through the debug menu.
- In the final, all side-scrolling levels have this transition at the start.
- Starting a new game sometimes puts you at the midpoint of the first level.
- No map on the lower screen for any of the tunnel/3D stages
- At any of the walls/barricades to destroy in the tunnel stages, pressing R automatically scrolls you forward through the level to the next wall.
- You can repeat this until the boss battle.
- Interestingly, contacting enemies/dangers along any walls as you zip by them will kill you, meaning they programmed hit boxes into the enemies.
- The screen fade-in at the start of the tunnel stages is faster.
Stages
Jungle
- Different enemy and powerup locations, spawn points
- Also slightly different player respawn spots
- Slight layout/structural and graphical differences
- You can't drop down below some platforms/higher grounds.
- Ducking and hiding in the water doesn't protect you from enemy contact and attacks.
- Various missing sound effects
- Rail-mounted track car sub-boss has significantly more hit points
- Its missile does less damage to enemies with multiple hit points.
- There is collision between the sub-boss and powerup falcons, meaning the powerups may sometimes be sitting atop the car.
- No animation for the player exiting the track car; they just warp out immediately
- Stage boss differences: sound, hit points, etc.
- No collision between stray enemies that followed you into the battle, so they just run through the wall and off-screen
Waterfall
- Named Laboratory in the final
- Various missing sound effects
- Different enemy and powerup locations, spawn points
- Slight structure and graphical differences
- Interestingly, you can backtrack a few feet in the starting laboratory section.
- Boulders fall out of holes less frequently in the actual waterfall section.
- Different, much simpler waterfall background animation
- During the stage boss entrance, the soldier it rips apart has no gore effects.
- Different boss attack patterns, especially the projectiles that it spits out erratically
- No explosive destruction graphics for the boss
Tunnel 1
- Named Base in the final
- No enemy sounds at all
- Powerup falcons appear very briefly before disappearing without blinking. They also often can't be picked up.
- Powerup differences; enemy spawn point and behavior differences (more aggressive)
- Rollers can't be destroyed.
- Slight structural differences
- Less variation in the lighting
- Lack of collision detection with some dangers
- The stage boss is stuck in its mirror image phase throughout the battle (although it can be destroyed).
- It does not attack.
- Different, rudimentary destruction animation
- Game usually crashes after defeating the boss.
Missile
- Named Harbor in the final
- Buggy transition effect at the start
- Different powerup placements and enemy placements/spawn points
- Many layout/structural differences
- Submarine sub-boss differences: hit points, attack patterns
- Missile Hugger 3000 sub-boss rarely uses the punch attack; slight pattern difference otherwise
- Very different missile riding sequence: small rocket patterns (and harder to destroy), grappling switches locking and unlocking, booster flames pattern
- The switches are easier to cling to, as the player grabs them immediately, rather than only during the fall of a jump.
- The booster flame pattern is longer, sets off quicker (more difficult to dodge) and has different sprites (interestingly, they look like the fire puff sprites from Contra III).
- Your aim may become fidgety while hanging on the switches.
- Stage boss doesn't punch diagonally.
Ocean
- Different screen transition at the start
- Various missing sounds
- Different powerup placements, enemy spawns
- Your jet bike does not get destroyed after losing your last life.
- Powerups don't slide across the water surface; they just sink down off-screen.
- If they land on your jet bike after you die, they do slide off of it and sink into the water.
- The piranha gauntlet at the start is longer and more intense.
- Segmented fish sub-bosses are easier: broader and more predictable arcing patterns
- Armored soldier sub-boss has a different animation.
- You need to destroy both the sub-boss and any remaining enemies (or the latter must move off-screen) before the game progresses to the stage boss.
- Very unstable stage boss
- If you attack its eye when it first appears, the game crashes.
- Other frequent crashes
- Other boss battle differences: no piranhas appear, slight pattern differences
- Before the boss appears, the herd of piranhas that fly by aren't rendered correctly, lacking the underwater tint.
Tunnel 2
- Named Factory in the final
- Resource-heavy stage, creating a lot of lag and frequently crashing the game
- No powerups at all
- Soldiers and turrets have different patterns. Many of their attacks are harmless.
- A lot of different wall layouts, including their turrets
- Graphical differences, including simpler designs for some enemies
- Alignment errors for enemy projectiles
- Simpler destruction animations
- Incomplete programming for the grenadier enemies: their grenades disappear, they don't follow you, sometimes they simply don't attack
- They also have a standing frame that was cut from the final.
- More of them don't respawn
- The protective shell on some of the wall targets are indestructible. As a consequence, you can't progress by regular means.
- Press R to move to the next wall.
- The target boards behave very differently, are glitchy and much more difficult to destroy.
- The crusher section is very incomplete, but the wall destroys by itself if you wait a bit.
- You must wait out this sequence instead of skipping ahead to the boss battle by pressing R; otherwise, you will be soft-locked as the boss won't appear.
- Very different boss battle:
- It is already in view, instead of breaking through the wall.
- You are 20 or so feet away from the boss here, instead of up close to it.
- Therefore, its long-range flame attack looks a bit amusing.
- The flame attack pattern itself is very different.
- The boss' arms animate as if they're holding open doors (when there are actually none).
- There is a whole different, cut second phase of the boss battle, where it crawls up to the player and tries to swat them.
- Once you shoot its head enough, the third (second in the final) phase occurs, which also has some differences in the transition.
- Differences in the third phase: wall button graphics, entirely different boss flame attack patterns and other animations, you are once again several feet away from the boss
- The boss destruction animation is very interesting. It is more complex/elaborate than in the final: a piece of its head is sectioned off by the door, which drops down and bounces around the walls, floor and ceiling a bit before rocking in place to a halt.
- In the final, the whole head just drops.
- Static, bright lighting during the battle (dark and strobing in the final); simpler lighting throughout the stage, even
City
- Slight structural/layout differences; especially during the boss battle, where there are destroyed buildings here
- Different enemy and powerup placements
- Various missing sounds
- The grenadier enemy is much more aggressive, able to launch grenades at your position even when you're far away.
- Tank sub-boss is graphically unstable.
- Sprite, animation and pattern differences in the arachnid sub-boss
- You can fire through the upper highway path near the end.
- Boss battle differences: improperly colored enemy bikes, you can't stand on the boss' undercarriage, incomplete end-stage transition
Tunnel 3
- Named Alien Hive in the final
- Oddly, the laser's projectiles (both forms) appear green in this level.
- No powerups at all
- Various missing sound effects
- Graphical and animation differences in the enemies
- Different patterns and placements, too (turrets can't be destroyed)
- Layout/structural differences
- Little to no atmospheric light variation, including at the boss battle
- Destroying the core on the first wall doesn't destroy the wall, so you're stuck unless you press R to advance to the next wall.
- Amusingly, one of the corridors features the face hugger enemies from the last level, fully in side view angle (making them stick out).
- The wall before the boss also doesn't destroy.
- Likely as a result of the above, when you press R to get to the boss, the battle never really begins and you can't destroy the heart or do anything. This leaves you soft-locked.
Black Viper
- Named Harvest Yard in the final
- Incomplete starting transition effect
- Various missing sound effects
- Enemy and powerup placement differences
- Enemy pattern differences
- Many layout/structural differences
- Occasional graphical glitches, like with enemy sprites
- Alien enemies appear in the starting area, whereas it's devoid of any enemies in the final.
- Black Viper sub-boss differences: fewer hit points, simpler patterns, some sprites/effects and animations
- One example are the grapple points after you shoot out an opening in its mutated form. They're green and aren't actually visible until you grapple onto them.
- Crushers are different in appearance and are harmless.
- Final boss differences:
- Consists of phases, the first of which which already begins as the elevator is rising up to Black Viper's head. The eyeballs already appear.
- These eyeballs actually had a purpose, attacking the player and needing to be destroyed for the next phase to begin.
- When the actual boss appears in the next phase, the snake heads don't appear immediately with it.
- You have to destroy the red eyes of the demon-like inner head.
- Sometimes, either a bouncing projectile briefly appears or a crudely shaped and colored enemy appears (functioning similarly to one of the final version's brain attack patterns); the latter will remain until destroyed.
- The snake heads have different sprites and animation (including lack of a a death animation; they retract like normal), and fewer hit points.
- The overall pattern in this boss battle is much simpler.
- Defeating the boss crashes the game on a white screen.
- Consists of phases, the first of which which already begins as the elevator is rising up to Black Viper's head. The eyeballs already appear.
Challenge Mode
- Very incomplete. Some challenges don't work at all, others are buggy (can randomly crash the game, for example), the order is different/temporary; cut challenges; many of the nameplates in the list are missing, labels are generic.
- No indication of which, and how many challenges are complete. There is a page indicator, instead.
- However, all 40 challenges are accessible from the start (whereas they need to be unlocked progressively in the final).
- A glitch where leaving the challenge menu too quickly will lead to a black screen. You're actually still on the challenge menu and can scroll through them, select a challenge or press B to return to the intro sequence.
- Different VICTORY and DEFEAT messages.
- When these messages appear, you are still vulnerable to dangers (although inconsequential).
- In the final, you get 1 life per challenge and dying causes you to lose the challenge (displaying DEFEAT). In most of the challenges here, except the Rematch ones, that doesn't happen; you get 99 lives, making the challenge way easier.
- Sometimes, the level plays out as if it's in normal play, and will even lead to the next level.
- But as a result, you can't complete the challenge, either (no VICTORY message).
- Sometimes, the level plays out as if it's in normal play, and will even lead to the next level.
- The final's pause menu during challenges shows the stage name and challenge description; not in this prototype.
- Quitting a challenge takes the player back to the main menu, instead of the Challenge menu.
Mutt Hunt Challenges
- No mutt counter
- If you miss a mutt and it runs off-screen, you lose the challenge (it lets you play to the end of the challenge in the final)
- The VICTORY appears immediately upon defeating the last mutt here; in the final, you need to reach a certain point in the level.
Pacifism Challenges
- The character animates like they're firing when you press the fire button.
- Firing while pressing the debug weapon swap (Select) will occasionally cause the character to shoot a primary level fireball.
- Sometimes, the weapon falcon icons appear at the top of the screen (they're absent during these challenges in the final).
Low Ammo Challenges
- The debug weapon swap glitch mentioned above for the Pacifism Challenges also occurs here, after you run out of ammo.
- The Crush missiles (both forms) decrement the ammo count unpredictably, from 1 to 9 rounds. In the final, both take 1 round per shot.
Gunplay Challenges
- When using the classic laser, the debug weapon swap glitch above also occurs here.
Speed Run Challenges
- The timer continues to count down while the game is paused.
Accuracy Challenges
- The accuracy counter is different from the final. It adds a certain percentage to the current number upon firing a round; then, it either adds or removes a certain amount (depending on if the round was a hit or a miss). In the final, the percentage changes to a new number (increases/decreases) when a round either hits something or disappears off-screen.
Friendly Fire Challenges
- Incomplete hostage AI
Rematch Challenges
- You don't get the level 1 Spread gun at start of these, unlike in the final (though it doesn't matter since you can cycle through all the weapons by pressing Select, anyway).
- Defeating the boss doesn't display VICTORY; you just go back to the challenge menu.
Challenge 1 (Mutt Hunt)
- Mutt Hunt 1 in the final (Challenge 3)
- The mutts are purple here (likely a palette error).
- Different location for one of the mutts
Challenge 2 (Mutt Hunt)
- Mutt Hunt 4 in the final (Challenge 27)
- Different mutt and enemy placements, with several missing enemies (making it easier)
- The Barrier powerup can kill mutts in the background upon contact
Challenge 3 (Mutt Hunt)
- Mutt Hunt 3 in the final (Challenge 20)
- Different mutt placements
- Glitch where you restart this challenge after quitting it, you start much later in the level.
Challenge 4 (Mutt Hunt)
- Mutt Hunt 5 in the final (Challenge 31)
- No mutts; challenge can't be completed and no messages appear.
- Defeating the stage boss freezes the game.
Challenge 5 (Low Ammo)
- Low Ammo 2 in the final (Challenge 35)
- Starting point is later in the level instead of the actual level start.
- 100 bullets instead of 32
- Ends at the start of the stage boss
Challenge 6 (Low Ammo)
- Low Ammo 1 in the final (Challenge 33)
- Completely different location, starting at the base of the missile climb and ending before it launches.
- In the final, the challenge occurs from the level start to the submarine defeat.
- These start & end points are similar to those of other challenges in both the prototype and final.
Challenge 7 (Low Ammo)
- Low Ammo 3 in the final (Challenge 38)
- Starts at the actual start of the stage, instead of after the first climb up Black Viper.
- Can't be completed because the game crashes after defeating the first form of Black Viper.
- 41 rounds instead of 15, though the counter doesn't display.
Challenge 8 (Pacifism)
- Pacifism 3 in the final (Challenge 11)
- Starts a bit later in the stage
- More difficult due to not having a reduction in enemies in the stage
- But ends earlier than in the final, at least
Challenge 9 (Low Ammo)
- Cut challenge
- Begins at the actual stage start of Ocean
- 60 rounds of ammo
- Ends as the segmented fish sub-bosses appear
Challenge 10 (Pacifism)
- Pacifism 4 in the final (Challenge 37)
- Begins literally at the starting point, instead of several feet ahead of it
- Ends much earlier
Challenge 11 (Pacifism)
- Pacifism 2 in the final (Challenge 4)
- Pretty much the same as final
Challenge 12 (Bad Guy Blitz)
- Cut challenge
- Starts at the beginning of the upper and lower highway paths in the City, and ends at the end of the upper path.
- Analogous to Bad Guy Blitz 1 in that it has aliens instead of enemy soldiers
Challenge 13 (Bad Guy Blitz)
- Bad Guy Blitz 2 in the final (Challenge 5)
- Same start and end points as Challenge 8
- Different enemy spawn points
Challenge 14 (Pacifism)
- Pacifism 1 in the final (Challenge 2)
- Pretty much the same as final
Challenge 15 (Bad Guy Blitz)
- Bad Guy Blitz 1 in the final (Challenge 1)
- Slightly different start & end points
- Enemies only appear on the upper path
Challenge 16 (Bad Guy Blitz)
- Bad Guy Blitz 5 in the final (Challenge 14)
- Different end point
- White palette (corrupted) Proboterror enemies
- Different spawn points
Challenge 17 (Bad Guy Blitz)
- Same start & end points as Challenge 12, making it a variant of Bad Guy Blitz 1.
- The Proboterror enemies here are brown.
- Different spawn points
Challenge 18 (Accuracy)
- Accuracy 3 in the final (Challenge 25)
- Same start & end points as Challenge 8
- Minimum 50% accuracy, instead of 70%
Challenge 19 (Bad Guy Blitz)
- Bad Guy Blitz 4 in the final (Challenge 10)
- Starts after the first climb up Black Viper
- Can't complete this challenge, and neither message appears (can reach and fight the boss)
Challenge 20 (Accuracy)
- Accuracy 2 in the final (Challenge 21)
- Ends at the same point as Challenge 10.
- Minimum 25% accuracy instead of 100% (way easier)
Challenge 21 (Accuracy)
- Cut challenge
- Starts at the very start of the Ocean stage, ending at the same point as Challenge 9.
- Minimum 75% accuracy
Challenge 22 (Speed Run)
- Speed Run 5 in the final (Challenge 36)
- Same start & end points as Challenge 8
- 40 seconds to complete; 30 in the final
Challenge 23 (unknown)
- Non-functional
Challenge 24 (Accuracy)
- Accuracy 1 in the final (Challenge 17)
- VICTORY appears immediately at the start, so not much is known about this challenge.
Challenge 25 (unknown)
- Cut challenge
- Starts at the battle with the Missile Hugger 3000 in Harbor
- Your character is not visible on the screen, though gun fire can be heard.
- VICTORY appears immediately at the start, so not much is known about this challenge.
Challenge 26 (Speed Run)
- Speed Run 3 in the final (Challenge 19)
- About 40 seconds to complete, although the timer doesn't display; 56 in the final
- You will always lose this challenge because the time provided isn't enough to reach where the challenge ends in the final...
- However, using the L+R debug function as a cheat, you'll discover that there is no apparent end point, making this challenge impossible.
Challenge 27 (unknown)
- Non-functional
Challenge 28 (Gunplay)
- Gunplay 2 in the final (Challenge 15)
- Same start point, but much later end point, making this a much longer challenge
- Same restart glitch as Challenge 3
- The level is nearly devoid of enemies, save for some red and blue mech soldiers, as well as regular foot soldiers
Challenge 29 (Speed Run)
- Speed Run 3 in the final (Challenge 19)
- Basically a variation of Challenge 26 (with the same issues).
- Except you start immediately on a Face Hugger egg, dying off the bat.
- Glitched sprites
Challenge 30 (Gunplay)
- Gunplay 1 in the final (Challenge 6)
- Ends much later in the level, making it last longer
- Your falcon icons appear, despite using the "prototype" weapon
- Severe lag at the starting area
- Almost no enemies, except for the submarine sub-boss and Proboterror enemies
Challenge 31 (Gunplay)
- Gunplay 4 in the final (Challenge 30)
- Mostly no enemies, except for occasional foot soldiers.
- The wall turrets are already destroyed.
- Graphical glitch on the bridges
- Restarting this challenge isn't a good time. The upper screen graphics will corrupt and you need to restart the game.
Challenge 32 (Friendly Fire)
- Friendly Fire 2 in the final (Challenge 26)
- Starts and ends later than in the final
- Different hostage locations and it's always the same hostage sprite (woman)
Challenge 33 (Friendly Fire)
- Cut challenge
- Same start point as Challenge 15 (Harbor)
- Broken collision detection with the hostages, who only appear on the upper path.
- They can fall through the ground of the upper path, and then even the lower path (at which point they fall off-screen).
Challenge 34 (Gunplay)
- Gunplay 3 in the final (Challenge 22)
- Starts at the actual stage start (instead of atop the first climb)
- Can't be completed, as the game freezes upon defeating the first form of Black Viper.
Challenge 35 (Friendly Fire)
- Friendly Fire 1 in the final (Challenge 18)
- Different hostage locations, and they're all the same sprite (man)
- Replaying this challenge after playing others will place you at the start of the waterfall section of the stage, VICTORY appearing immediately.
Challenge 36 (unknown, possibly Friendly Fire)
- Possibly Friendly Fire 4 in the final (Challenge 34)
- VICTORY message immediately upon starting, so the details of this challenge are unknown.
- Same restart glitch as Challenge 3, but again, with the VICTORY message
Challenge 37 (Rematch)
- Rematch 2 in the final (Challenge 16)
- You start in free-fall, so you have to quickly react by moving to the right and holding Up to grab the vine.
- Can't be completed, as the game crashes after the boss is defeated.
Challenge 38 (Rematch)
- Rematch 5 in the final (Challenge 40)
- Slightly different start point
- Can't be completed, as the game crashes after the boss is defeated.
Challenge 39 (Rematch)
- Rematch 1 in the final (Challenge 8)
- Enemies will spawn from the left of the screen until you initiate the battle.
- Since you die by falling into the pit, which includes during the actual level end sequence, it's very hard to complete this challenge. Use the helicopter glitch to be taken behind in the stage to wherever it's safe until the challenge ends.
Challenge 40 (Rematch)
- Rematch 4 in the final (Challenge 32)
- Similar starting point
- Easiest Rematch challenge in this prototype due to the debug weapon select
Bugs
- Unstable; crashes can occur randomly, even from making menu selections.
- Bugs/glitches during gameplay,
