Pokémon Card GB2/Debugging Material
This is a sub-page of Pokémon Card GB2.
Contents
- 1 Start-Up Debug Menu
- 2 In-Game Debug Menu
- 2.1 BG Font State (BGフォントの状態)
- 2.2 BG Face Display (BGフェイスの表示)
- 2.3 Effect Viewer (エフェクトの再生)
- 2.4 OBJ Character Display (OBJ人物の表示)
- 2.5 Clear Mail (メールクリア)
- 2.6 Tournament Table (トーナメント表)
- 2.7 Send Mail (メール送信)
- 2.8 Adjust Chips (しょじきんへんこう)
- 2.9 Name Entry (なまえにゅうりょく)
- 2.10 Staff Roll (スタッフロール)
- 2.11 Exit (とじる)
- 3 Scenario Debug Menu
- 4 Pause Mode
Start-Up Debug Menu
Enabled with Game Genie code BE0-37B-08C, this menu will pop up when the game first boots.
Power On (パワーオン)
This will boot the game as usual.
Coins (コイン)
Shows all the game's event coins (not just the ones you own) to choose for the "Duel" option. If no save is present, the game will default to the Chansey Coin.
Config (せってい)
Adjust configuration, same as the regular in-game menu.
Effect Viewer (エフェクトの再生)
The same option as the one from the main debug menu.
Staff Roll (スタッフロール)
Plays the credits.
Duel (たいせん)
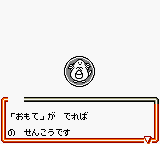
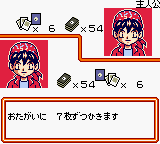
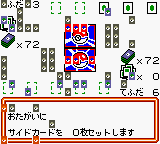
Starts a duel against a random opponent from the Lightning, Grass, Psychic, and Science Clubs, as well as Aaron and Sam. This option will pull the player's deck from the current save file. If none is present, the game will try to generate a deck, though this process seems fairly broken. It appears the player will end up drawing seven identical cards on the first turn, though there is no check to guarantee that this will be a base Pokémon, thus potentially causing a softlock if one ends up with a hand consisting of nothing but trainer cards or energy cards. Only Aaron and Sam are safe to battle, since the player will draw the tutorial deck every time.
Other oddities caused by the lack of save file include:
- The coin toss screen will lack a default player name, and the border of the text window will be partially miscolored.
- The player will default to be Mark, though one of the possible opponents is… also Mark (or rather, "Main Character").
- When fighting against "Mark", the game will glitch out during the initial card drawing animation, before ending in a loss for the player. Oddly enough this happens even when a save is present.
- The drawn Pokémon may start their first turn with no HP left.
- The drawn Pokémon may change on a whim based on what the opponent draws next, which includes things like energy cards.
Slot Machine (スロットマシン)
Used to test the 5-coin slot machine, giving you 100 coins in the process (though these don’t carry over to your save file).
Exit (とじる)
Will exit the menu and start the game normally if the cheat code is off. Otherwise it will only reload the menu (same as when B is pressed).
In-Game Debug Menu
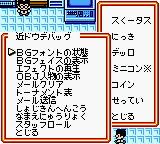
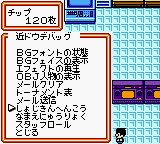
Enabled with Game Genie codes 418-50B-91B + 508-4FB-800 + 048-4EB-F76, this menu will replace "Coins" in the regular in-game menu. Some options here are repeats from the start-up menu, with even the name being the same, with it being "Shortcut Debug" (近ドウデバッグ).
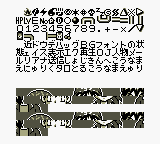
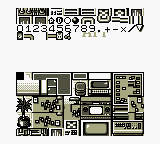
BG Font State (BGフォントの状態)
Split into two "pages", with the first showing the font, and the second the current background tiles. Press A or B to advance forward.
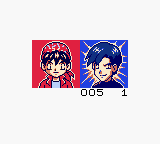
BG Face Display (BGフェイスの表示)
Shows every duelist's faces next to yours. There are 96 portraits, each with their own expression "states", with 0 being neutral, 1 being happy/winning, and 2 being sad/losing. When selected, this option starts at the fifth entry, which is Ronald's portrait. Entries 1 through 4 are assigned to Mark, Mint, and then their link battle counterparts. All of them lack expressions: you can scroll through them, but they all reuse the default portrait.
Controls:
- Left/Right: Scrolls forward/backward through the expressions.
- Up/Down: Scrolls forward/backward.
- A/B: Exits the menu.
Effect Viewer (エフェクトの再生)
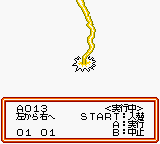
You can test out all of the game's move animations. There are 256 options (0-255), but there are only 140 animations (1-141), including things like screen shakes.
| Visual | Japanese | Translation |
|---|---|---|
| ||
| A<###> <STATE>
<SIDE> START:入替 |
A<###> <STATE>
<SIDE> START:SWAP | |
| A:実行
<00> <00> B:中止 |
A: PLAY
<00> <00> B: STOP |
"State" refers to either "Playing" (実行中) or "Stop" (テイ止), while "Side" refers to either "To left, from right" (左から右へ) or "To right, from left" (右から左へ). The two values in the bottom left corner are updated as the menu gets used: both change to 01 01 when an animation is played, with the second value briefly changed to 00, and then back to 01 when the same animation is played again. Pressing B will reset everything to 00 00.
Controls:
- A: Play the selected animation.
- B: Stop the currently playing animation.
- Left/Right: Scrolls forward/backward.
- Up/Down: Scrolls forward/backward by an increment of 10.
- Start: Change on which side the animation will play (player or opponent).
- Select: Exits the menu.
OBJ Character Display (OBJ人物の表示)
Shows you all the character sprites in the game, with the background being the top left corner of a random map. There are 221 characters to choose from, though a good handful are duplicated, like the Scientist and the Receptionist. Also included are some objects (like the GR blimp) or animations (like the overworld map cursors).
Scroll forward/backwards with Up/Down, and exit with either A or B.
Clear Mail (メールクリア)
Refreshes the screen and deletes all mail, including mail currently being sent.
Tournament Table (トーナメント表)
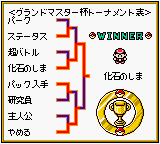
Shows you the interface for the "Grand Master Cup Tournament Table" (グランドマスター杯トーナメント表 ). This option tests out the layout for the screen normally seen after each battle during the Pokémon Dome's Grand Master Cup. While in-game the listed names are that of the duelists the player faces against, here the game instead draws from an eclectic set of miscellaneous strings. The "duelists" are as follows: the player (here Mark / パーク), Status (ステータス), Psychic Battle (超バトル), Island of Fossil (化石のしま), Receive Pack (パック入手), Tech (研究員), Main Character (主人公), and Cancel (やめる).
Each time this option is accessed, a winner will be chosen at random, though the player's sprite will always be used to represent them. The progress each "duelist" made during the cup will also be randomized: in the above example, Cancel lost on the first round, but upon reloading the menu they may make it to the last round, or even win.
Send Mail (メール送信)
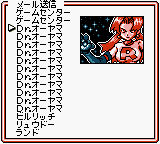
Opens a menu with the "Rocket's Sneak Attack" card illustration in the upper right corner, with it going away as soon as one chooses an option. A total of 16 choices are listed, with them being Game Center (ゲームセンター), Dr. Mason (Dr.オーヤマ), Biruritchi (ビルリッチ), Rod (リュウドー), and Ronald (ランド).
Confirm with A, and exit with B. Confirm will print the debug option's name in the text box at te bottom, and the mail will be sent to your mail box afterwards (though you will have to reload the area by going to the overworld).
Adjust Chips (しょじきんへんこう)
Fuel your gambling addiction. Add/Subtract the number of chips you have by an increment of 10 with Left/Right, and 100 with Up/Down. Exit the menu with B.
Name Entry (なまえにゅうりょく)
Change your name through the same menu as the one brought up when first starting the game.
Staff Roll (スタッフロール)
The same option as the one from the start-up debug menu.
Exit (とじる)
Self-explanatory.
Scenario Debug Menu
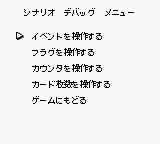
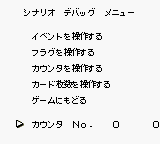
That's right, there are no less than three separate debug menus in this game. Use the codes 116-0BB-F7A + A86-0CB-91C + 496-0DB-E63 + C96-0EB-5D5 for the "Scenario Debug Menu" (シナリオ デバッグ メニュー) to replace "Status" in the regular menu.
This is the least polished of the debug menus. Some options work, some sort of work, and some are just really confusing to use.
Modify Events (イベントを操作する)
This option lists a series of options at the bottom of the screen. Scroll through them with Left/Right (Up/Down acts as a "quick scroll"), select with A, and exit with B.
Some items in this menu work fine, others, not so much.
| Event | Translation | Description |
|---|---|---|
| ゲームクリア直後にする | Right After Beating The Game | Select this and the game has been beaten in the blink of an eye. Everyone has been defeated, every path has been cleared, and the entire GR Island map is open. Only the Sealed Fort remains locked, since it requires defeating King Biruritchi a second time. |
| プレイヤーの性別を入れ替える | Swap Player Gender | When called from the menu, this option won't work properly. Your name will be replaced by the default male/female name, and your portrait will change, but it appears the command to change the overworld sprite is borked. Indeed, you will become frozen in place, and your sprite won't even update. Saving and reloading won't work either, though using the option again will revert everything to normal. |
| はじまりの島に行く | Go To Starting Island | Using the option and returning to the overworld will take you somewhere different. On TCG island you will be at the TCG Island Airport, and on GR Island you will be at the GR Psychic Stronghold. |
| GR団の島に行く | Go To GR Island | Using the option and returning to the overworld will take you somewhere different. On TCG island you will be at Dr. Mason's Laboratory, and on GR Island you will be at the GR Island Airport. |
| すべてのコインをゲットする | Get All Coins | Works as advertised. |
| すべてのメールを配信する | Deliver All Mail | This doesn't literally deliver all your mail, rather it will send 16 mail to your mailbox. Leave to the overworld and back to receive the first 8, delete them out and repeat to get the other 8. Note the game will freeze on the map (the first time) if you have mail in your box. |
| チャレンジマシンのデータを壊す | Reset Challenge Machine Data | Will reset both Challenge Machines' data. The first time you select either of them, it will give you a message saying that the data is broken, and to try and get a new score. |
| ふういんのトリデOPEN | All Forts Open | Causes ONLY the Sealed Fort to open. |
| GM杯開催(クリアデータのみ) | Hold The GM Cup (Clear Data Only) | Triggers the Grand Master Cup at the Pokémon Dome, which normally is only accessible after winning 10 times in a row in Link Battles. |
| すべてのカードを10枚ふやす | Get 10 Cards | You get 10 more of every card, including energy cards. |
| エネルギーカードを10枚ふやす | Get 10 Energy Cards | You get 10 more of every energy cards. |
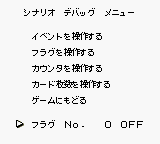
Modify Flags (フラグを操作する)
An option which lets one edit all of the game's story progression flags. Each one can be set to either ON or OFF.
| To do: Identify the missing flags. |
| Flag # | Purpose |
|---|---|
| 0 | Player portrait state. ON is Mint's portrait, and OFF is Mark's. |
| 1 | Challenge Machine state for Dr. Mason's lab. When OFF, the machine doesn't appear, and vice-versa. |
| 2 | Unknown flag. Setting it ON seems to softlock the game when reloading the current map, leaving it stuck on a black screen. |
| 3 | Unknown flag. Setting it ON will make the challenge machine in Dr. Mason's lab appear, though you won't be able to interact with it. Walking through the lab's main room will also unset the flag. |
| 4 | Chansey Coin flag. ON marks it as obtained, and OFF takes it away from the inventory. |
| 5 | Oddish Coin flag. |
| 6 | Charmander Coin flag. |
| 7 | Starmie Coin flag. |
| 8 | Pikachu Coin flag. |
| 9 | Alakazam Coin flag. |
| 10 | Kabuto Coin flag. |
| 11 | GR Coin flag. This flag gives you the entire coin. |
| 12 | GR Coin flag. This flag gives you the top left coin piece. |
| 13 | GR Coin flag. This flag gives you the top right coin piece. |
| 14 | GR Coin flag. This flag gives you the bottom left coin piece. |
| 15 | GR Coin flag. This flag gives you the bottom right coin piece. |
| 16 | Magnemite Coin flag. Once set, the third Auto-Deck machine in Dr. Mason's lab will also appear. |
| 17 | Golbat Coin flag. |
| 18 | Magmar Coin flag. |
| 19 | Psyduck Coin flag. |
| 20 | Machamp Coin flag. |
| 21 | Mew Coin flag. |
| 22 | Snorlax Coin flag. |
| 23 | Togepi Coin flag. |
| 24 | Ponyta Coin flag. |
| 25 | Horsea Coin flag. |
| 26 | Arbok Coin flag. |
| 27 | Jigglypuff Coin flag. |
| 28 | Dugtrio Coin flag. |
| 29 | Gengar Coin flag. |
| 30 | Raichu Coin flag. |
| 31 | Lugia Coin flag. |
| 32 | Flag set when talking to Gene for the first time. |
| 33 | Flag set when talking to Matthew for the first time. |
| 34 | Flag set when talking to Ryan for the first time. |
| 35 | Flag set when talking to Andrew for the first time. |
| 36 | Flag set when talking to Mitch for the first time. |
| 37 | Flag set when talking to Michael. Seems to only apply after Mitch has been freed. |
| 38 | Flag set when talking to Chris. Seems to only apply after Mitch has been freed. |
| 39 | Flag set when talking to Jessica. Seems to only apply after Mitch has been freed. |
| 40 | Flag set when talking to Nikki. |
| 41 | Flag set when talking to Brittany for the first time. |
| 42 | Flag set when talking to Kristin for the first time. Handles the Legendary Power booster pack gift prior to her leaving the lobby. |
| 43 | Flag set when talking to Heather for the first time. Handles the Island of Fossil booster pack gift prior to her leaving the lobby. |
| 44 | Flag set after beating Brittany for the first time. |
| 45 | Flag set when talking to Rick for the first time. |
| 46 | Flag set when talking to David for the first time. |
| 47 | Flag set when talking to Joseph for the first time. |
| 48 | Flag set when talking to Erik. Seems to only apply after Rick has been freed. |
| 49 | Flag set when talking to Amy. Seems to only apply after she's sitting down. |
| 50 | Flag set when talking to Joshua. Seems to only apply after the club has been freed. |
| 51 | Flag set when talking to Sara. Seems to only apply after the club has been freed. |
| 52 | Flag set when talking to Amanda. Seems to only apply after Steve has been freed. |
| 53 | Unknown flag. |
| 54 | Unknown flag. |
| 55 | Flag set when talking to Isaac for the first time. Cleared after beating him once, and kept set on repeat interactions. |
| 56 | Flag set when talking to Jennifer for the first time. |
| 57 | Flag set when talking to Nicholas for the first time. Cleared after beating him once, and kept set on repeat interactions. |
| 58 | Flag set when talking to Brandon for the first time. |
| 59 | Flag set when beating Nicholas for the first time. Check required to be able to battle Isaac the first time. |
| 60 | Flag set when talking to Ken for the first time. |
| 61 | Flag set when talking to John. Seems to only apply after the club has been freed. |
| 62 | Flag set when talking to Adam for the first time. |
| 63 | Flag set when talking to Jonathan. Seems to only apply after the club has been freed. |
| 64 | Flag set when talking to Murray for the first time. |
| 65 | Flag set when talking to Robert. Seems to only apply after the club has been freed. |
| 66 | Flag set when talking to Daniel. Seems to only apply after the player gained access to GR Island. |
| 67 | Flag set when talking to Stephanie. Seems to only apply after the club has been freed. |
| 68 | Flag set after beating Murray for the first time, as part of the Psychic Club takeover event. |
| 69 | Flag set when first walking into the Psychic Club's "duel room". |
| 70 | Flag set when talking to Midori. |
| 71 | Flag set when talking to Yūta. |
| 72 | Flag set when talking to Miyuki. |
| 73 | Flag set when talking to Morino. Cleared after beating him once, and kept set on repeat interactions. |
| 74 | Flag set after freeing Rick. |
| 75 | Door state for Yūta's room. When OFF, the doors are closed, and vice-versa. |
| 76 | Door state for Miyuki's room. When OFF, the doors are closed, and vice-versa. |
| 77 | Flag set after beating Morino. |
| 78 | Flag set when talking to Renna. |
| 79 | Flag set when talking to Ichikawa. |
| 80 | Flag set when talking to Catherine. |
| 81 | Flag set when talking to Tap. |
| 82 | Door state for Renna's room. When OFF, the doors are closed, and vice-versa. |
| 83 | Door state for Ichikawa's room. When OFF, the doors are closed, and vice-versa. |
| 84 | Flag set after beating Catherine. |
| 85 | Flag set when talking to Jes. |
| 86 | Flag set when talking to Yūki. |
| 87 | Flag set when talking to Shōko. |
| 88 | Flag set when talking to Hidero. |
| 89 | Door state for Jes' room. When OFF, the doors are closed, and vice-versa. |
| 90 | Door state for Yūki's room. When OFF, the doors are closed, and vice-versa. |
| 91 | Door state for Shōko's room. When OFF, the doors are closed, and vice-versa. The small bridge is also affected in the same manner. |
| 92 | Flag set after beating Hidero. |
| 93 | Flag set when talking to Miyajima. |
| 94 | Flag set when talking to Senta. |
| 95 | Flag set when talking to Aira. |
| 96 | Flag set when talking to Kanoko. |
| 97 | Door state for Miyajima's room. When OFF, the doors are closed, and vice-versa. |
| 98 | Bridge state for Senta's room. When OFF, the bridge is missing, and vice-versa. |
| 99 | Door state for Aira's room. When OFF, the doors are closed, and vice-versa. |
| 100 | Flag set after beating Kanako. |
| 101 | Flag set when talking to Kamiya. Seems to only apply after both Gōda and Grace have been defeated. |
| 102 | Flag set when talking to Gōda. |
| 103 | Flag set when talking to Grace. |
| 104 | Flag set after beating Kamiya. |
| 105 | Flag set after freeing Mitch. |
| 106 | Chest state in Grace's room. When ON, the chest appears, and vice-versa. |
| 107 | Flag set when talking to Miwa. |
| 108 | Flag set when talking to Kevin. |
| 109 | Flag set when talking to Yōsuke. |
| 110 | Flag set when talking to Ryōko. |
| 111 | Flag set when talking to Mami. |
| 112 | Flag set after beating Miwa. |
| 113 | Flag set after beating Kevin. |
| 114 | Flag set after beating Yōsuke. |
| 115 | Flag set after beating Ryōko. |
| 116 | Flag set after beating Mami. |
| 117 | Flag set when talking to Nishijima for the first time. |
| 118 | Flag set when talking to Ishii for the first time. |
| 119 | Flag set when talking to Samejima for the first time. |
| 120 | Flag set after beating Nishijima. |
| 121 | Flag set after beating Ishii. |
| 122 | Flag set after beating Samejima. |
| 123 | Flag set after beating all three members of the Colorless Altar. |
| 124 | Flag set when talking to Nishijima. Set at the same time as 117. |
| 125 | Flag set when talking to Ishii. Set at the same time as 118. |
| 126 | Flag set when talking to Samejima. Set at the same time as 119. |
| 127 | Flag set when talking to Kanzaki. |
| 128 | Flag set when talking to Rui. |
| 129 | Flag set after beating Kanzaki. |
| 130 | Flag set after beating Rui. |
| 131 | Flag set when meeting the GR Gal at Ishihara's Villa. Cutscene trigger. |
| 132 | Flag set when talking to Biruritchi. |
| 133 | Flag set after talking with the lass in the Rock Club lobby. In-game card trade event. |
| 134 | Flag set after talking to the old man in the Fighting Club lobby. In-game card trade event. |
| 135 | Flag set after talking with the mohawk boy in the Fire Club lobby. In-game card trade event. |
| 136 | Flag set after talking with the pigtails girl in the Lightning Club lobby. In-game card trade event. |
| 137 | Flag set after talking with the boy with glasses in the Psychic Club lobby. In-game card trade event. |
| 138 | Flag set after talking with the chap in the TCG Island Challenge Hall lobby. In-game card trade event. |
| 139 | Flag set after talking with the GR lad in the GR Grass Fort lobby. In-game card trade event. |
| 140 | Flag set after talking with the GR lass in the GR Lightning Fort lobby. In-game card trade event. |
| 141 | Flag set after talking with the GR granny in the GR Island Challenge Hall lobby. In-game card trade event. |
| 142 | Flag set after talking with the GR man in the GR Fire Fort lobby. In-game card trade event. |
| 143 | Flag set after talking with the boy with glasses in the GR Water Fort lobby. In-game card trade event. |
| 144 | Flag set after talking with the gal in the GR Psychic Stronghold lobby. In-game card trade event. |
| 145 | Unknown flag. |
| 146 | Unknown flag. |
| 147 | Flag set when talking to Sam. |
| 148 | Unknown flag. |
| 149 | Flag set when talking to Ishihara for the first time. |
| 150 | Flag set after having a battle with Ishihara. |
| 151 | Flag set when talking to Ishihara after beating the game. |
| 152 | Met GR1 at Rock Club flag. Cutscene trigger. |
| 153 | Met GR4 at Lightning Club flag. Cutscene trigger. |
| 154 | Met GR4 at Psychic Club flag. Cutscene trigger. |
| 155 | Met Yūki at GR Fire Fort flag. Cutscene trigger. |
| 156 | Met GR Fighting Fort members flag. Cutscene trigger. |
| 157 | Met GR Psychic Stronghold members flag. Cutscene trigger. |
| 158 | Met Mami and Rod at the GR Psychic Stronghold flag. Cutscene trigger. |
| 159 | Met Colorless Altar members flag. Cutscene trigger. |
| 160 | Met Biruritchi, Rui and Kanzaki at the GR Castle flag. Cutscene trigger. |
| 161 | GR Castle stairs roadblock flag. Cutscene trigger. |
| 162 | Met Ronald at the Game Center. Cutscene trigger. |
| 163 | Flag set when talking to GR1 for the first time at the Fighting Club. |
| 164 | Flag set when talking to GR2 for the first time at the Science/Grass Club. |
| 165 | Flag set when talking to GR3 for the first time at the Water Club. Also triggers the "pan to the left" animation. Cleared after the battle. |
| 166 | Flag set when talking to GR4 for the first time at the Psychic Club. |
| 167 | Unknown flag. |
| 168 | Flag set after obtaining two pieces of the GR Coin. |
| 169 | Flag set when talking to GR5 for the first time at the Pokémon Dome. |
| 170 | Flag set when talking to GR5 at the TCG Island airport lobby. |
| 171 | Flag set after trading cards with the lass in the Rock Club lobby. |
| 172 | Flag set after trading cards with the old man in the Fighting Club lobby. |
| 173 | Flag set after trading cards with the mohawk boy in the Fire Club lobby. |
| 174 | Flag set after trading cards with the pigtails girl in the Lightning Club lobby. |
| 175 | Flag set after trading cards with the boy with glasses in the Psychic Club lobby. |
| 176 | Flag set after trading cards with the chap in the TCG Island Challenge Hall lobby. |
| 177 | Unknown flag. |
| 178 | Unknown flag. |
| 179 | Flag set after trading cards with the GR lad in the GR Grass Fort lobby. |
| 180 | Flag set after trading cards with the GR lass in the GR Lightning Fort lobby. |
| 181 | Flag set after trading cards with the GR granny in the GR Island Challenge Hall lobby. |
| 182 | Flag set after trading cards with the GR man in the GR Fire Fort lobby. |
| 183 | Flag set after trading cards with the boy with glasses in the GR Water Fort lobby. |
| 184 | Flag set after trading cards with the gal in the GR Psychic Stronghold lobby. |
| 185 | Cage state for Gōda's room. When ON, the cage (and Mitch) won't be there, and vice-versa. |
| 186 | Cage state for Midori's room. When ON, the cage (and Rick) won't be there, and vice-versa. |
| 187 | Unknown flag. |
| 188 | Unknown flag. |
| 189 | Unknown flag. |
| 190 | Flag set after entering the Grand Master Cup. |
| 191 | Flag set after freeing Courtney. Makes her appear at the Pokémon Dome. |
| 192 | Flag set after freeing Steve. Makes him appear at the Pokémon Dome. |
| 193 | Flag set after freeing Jack. Makes him appear at the Pokémon Dome. |
| 194 | Flag set after freeing Rod. Makes him appear at the Pokémon Dome. |
| 195 | Flag set after receiving 10 chips from the Game Center's pink-haired attendant. |
| 196 | Flag set after talking to the GR woman playing the slots at the Game Center. |
| 197 | Flag set after talking to the heavyweight boy by the Game Center's coin toss table. |
| 198 | Unknown flag. |
| 199 | Door state for GR Lightning Fort entrance. When OFF, the doors are closed, and vice-versa. |
| 200 | Door state for GR Fire Fort entrance. When OFF, the doors are closed, and vice-versa. |
| 201 | Door state for GR Water Fort entrance. When OFF, the doors are closed, and vice-versa. |
| 202 | Door state for GR Fighting Fort entrance. This flag sets the door as opened. Enabled after both 203 and 204 are set. |
| 203 | Door state for GR Fighting Fort entrance. This flag sets the left coin as being inserted. |
| 204 | Door state for GR Fighting Fort entrance. This flag sets the right coin as being inserted. |
| 205 | GR Island progression flag. When OFF, this flag prevents access to anything past the GR Fighting Fort. |
| 206 | Door state for GR Castle entrance. This flag sets the door as opened. Enabled after both 207 and 208 are set. |
| 207 | Door state for GR Castle entrance. This flag sets the right coin as being inserted. |
| 208 | Door state for GR Castle entrance. This flag sets the left coin as being inserted. |
| 209 | Door state for the Sealed Fort. This flag sets the door as opened. |
| 210 | Flag set after opening the chest in Grace's room. |
| 211 | Flag set after opening the chest in the GR Fighting Fort maze room "A3". |
| 212 | Flag set after opening the chest in the GR Fighting Fort maze room "A5". |
| 213 | Flag set after opening the chest in the GR Fighting Fort maze room "B4". |
| 214 | Flag set after opening the chest in the GR Fighting Fort maze room "D3". |
| 215 | Flag set after opening the chest in the GR Fighting Fort maze room "E4". |
| 216 | Flag set after opening the chest in the GR Fighting Fort basement. |
| 217 | Flag set after landing at the GR Island airport. Handles the flyover sequence, switching from the long one to the shorter one from the second trip onward. |
| 218 | Flag set after beating the Grand Master Cup. |
| 219 | Unknown flag. |
| 220 | Flag set after meeting Tobi-chan's apparition at the Sealed Fort. Lets the player interact with the Ghost Master statues. |
| 221 | Flag set after having a battle with Tobi-chan. |
| 222 | Flag set after having a battle with Eiji. |
| 223 | Flag set after having a battle with Magician. |
| 224 | Flag set after having a battle with Toshiron. |
| 225 | Flag set after having a battle with Pierrot. |
| 226 | Flag set after having a battle with Anna. |
| 227 | Flag set after having a battle with Dee. |
| 228 | Flag set after having a battle with Masquerade. |
| 229 | Flag set after having a battle with Yui. |
| 230 | Flag set after talking to Pawn. |
| 231 | Flag set after talking to Knight. |
| 232 | Flag set after talking to Bishop. |
| 233 | Flag set after talking to Rook. |
| 234 | Flag set after talking to Queen. |
| 235 | Unknown flag. |
| 236 | Unknown flag. |
| 237 | Flag set at the start of the game, and unset after Dr. Mason stops you from leaving the lab for the first time. Also gets set after other miscellaneous events, such as beating Isaac for the first time, as part of the Lightning Club takeover. |
| 238 | Unknown flag. |
| 239 | Unknown flag. |
| 240 | Unknown flag. |
| 241 | Flag set after miscellaneous events, such as beating Nicholas for the first time, as part of the Lightning Club takeover. |
| 242 | Unknown flag. |
| 243 | Unknown flag. |
| 244 | Ishihara state flag. Handles whether he will trade cards with the player or not. |
| 245 | Unknown flag. |
Modify Counter (カウンタを操作する)
| To do: Identify the purpose of each value. |
An option which lets you edit the game's "counters", which seemingly work the same way as event flags. There are 62 counters to change, each with a given variable. Most values go from 0-255, though some have a much lower range, as low as 0-1.
For example, counter 4 seems to be associated with Ronald, with its variable going from 1 to 2 after he gifts the player a card at the beginning of the game.
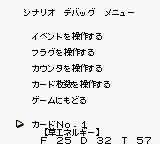
Modify Card Count (カード枚数を操作する)
By far the most useful feature of this menu. This option lets you choose any card (out of 445) and specify how many you own. While flipping through the cards, pressing Start will test the "You got X Card!" popup, though you still need to manually give yourself that card.
Three values (F, D, and T) will be listed at the bottom: F shows how many of a given card you own, and T is used to see how many more of the same card you can add (with 99 being the max value). Value D, when used to subtract from 99, will give you the max number of a given card you can own at once (for example, Grass Energy has a value of 32, meaning the player can own 67 copies of this card).
Excluded from value F are the cards you get at the very beginning of the game. Their default "owned" value will instead be accounted for in D: for example, you start off with four Lv.10 Charmander, and this card id has its D value set to 4. This was likely done to avoid any issues that could arise from the player having no cards on hand at all.
Return To Game (ゲームにもどる)
Works as intended, simply closing the menu.
Pause Mode
The GameShark code 0101D3CA will cause the game to pause/unpause whenever the Select button is pressed (music will continue playing, though). This function was used for debugging purposes, as seen in unused leftover text:
| Japanese | Translation |
|---|---|
ポーズモードがONになりました SELECTでポーズがかかります |
PAUSE MODE IS ON. PRESS SELECT TO PAUSE. |
ポーズモードがOFFになりました |
PAUSE MODE IS OFF. |

