Paper Mario: The Thousand-Year Door/Oddities
This is a sub-page of Paper Mario: The Thousand-Year Door.
Contents
- 1 Mario's House Full Interior
- 2 Cheep Cheep Blimp Hidden Detail
- 3 Bowser Action Stages - Inaccessible Blocks
- 4 Pianta Parlor Music
- 5 Red Bones Tattle Entry
- 6 Early Name
- 7 Sir Grodus' Dialogue Error
- 8 Doopliss' KO Resistance
- 9 Mario's Arms Texture
- 10 Petal Meadows Blow-away-able Bushes
- 11 Pianta Syndicate Obscure Dialog
- 12 Giant Hole in Gloomtail's Room
- 13 Unused Shopkeeper Dialog
- 14 Unseen Rawk Hawk Picture
- 15 Chapter 7 Structure
Mario's House Full Interior
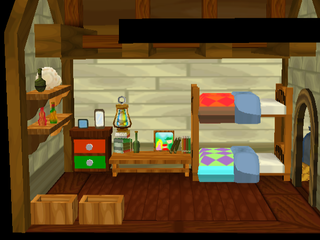
The interior of Mario's house in the opening scene contains a full recreation of the bedroom as it was in Paper Mario, plus a bunch of extra little details. Only the tiniest bit of it is visible in the opening, and this room is never seen outside of a cutscene. Sadly, Luigi's secret basement is not present.
By using cheat codes to play here, the map is revealed to have functional camera angles, bushes, a door, and even a rejecting pipe! The bushes and pipe are likely built from templates, but the interior's camera pans perfectly to and from the bedroom when walking in and out.
Cheep Cheep Blimp Hidden Detail
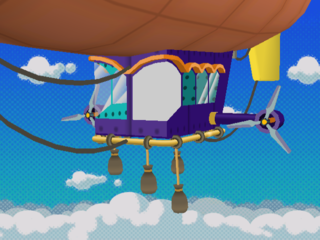
The left side of the 3D model for the Cheep Cheep Blimp, which is never shown to the camera, has an extra orange decoration over the windows that is missing from the right side. The decoration was likely removed on purpose, as the detail is not present on the blimp's 2D model. Despite this, it appears to be restored on the right side of the model in the trailer for the announcement of the Thousand-Year Door's 2024 remaster.
Bowser Action Stages - Inaccessible Blocks
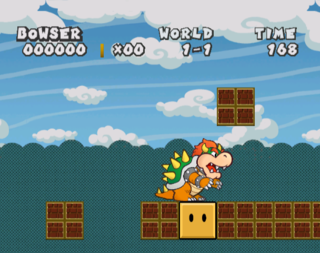
Chapter 2 (1-1)
This block is on top of the first set of blocks. With some careful jumps or by standing on top of the first pipe as full-size Bowser you can see part of it. You can also smash it while it's off-screen with full-size Bowser. Like the other Brick Blocks, it doesn't contain anything.
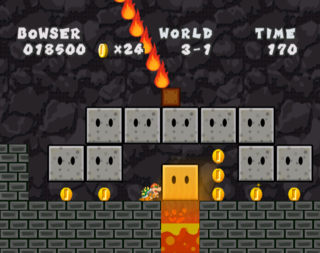
Chapter 6 (3-1)
While this block can be seen, you can't break it as you can only get near it in Bowser's smallest form. Like other Yellow Blocks, it contains some meat.
Pianta Parlor Music
The music for the mini-games in the Pianta Parlor uses the file name btl_zak3_32k.dsp. This might indicate that it was originally meant to be a battle track for common enemies, as the used battle music is btl_zak1_32k.dsp. ("zak" likely stands for zako, used here to mean small/weak opponents.) The numbering also seems to imply that a third battle song was planned before being scrapped completely.
Red Bones Tattle Entry
If the player fails to Tattle a one-time enemy, the enemy's Tattle Log entry will appear in Professor Frankly's trash can after the enemy disappears. However, the player can obtain the Red Bones' Tattle Log entry after defeating it in Chapter 1, even though the player is forced to fight another Red Bones in the Tower of Riddles. This implies that the second Red Bones battle was added later in development.
Early Name
Please insert
the "Paper Mario 2" Game Disc.
In the Interactive Multi-Game Demo Disc Version 18 demo and the final Japanese version, the "insert disc" message refers to the game as Paper Mario 2. This name can also be seen in multiple prerelease materials.
Sir Grodus' Dialogue Error
There is an error in the English version with choosing Mario's response after Sir Grodus is defeated at the Palace of Shadow and strikes Mario and co. with lightning. In other versions the text "Don't Attack" is placed above "Attack", but in the English version the text "Don't Attack" is incorrectly placed below "Attack". This causes Sir Grodus' response to be in the wrong order. If the player chooses "Don't Attack", he will say "WORM! You dare defy me?!?", even though Mario is doing what Grodus said. Likewise, if the player chooses "Attack", Grodus simply tells Mario to stop his blubbering.
Doopliss' KO Resistance
The second form of Doopliss (the one fought on Twilight Trail and the Creepy Steeple rematch) has a 3% chance to get KOed by Showstopper, even though the Star Power is unobtainable by that point. All other bosses fought before obtaining Showstopper are immune to the attack.
Mario's Arms Texture
| To do: replace video with screenshot |
Whenever Mario falls into water, a magnified version of his arm texture appears underneath the game area, outside the normal view of the camera. The same textures also appear during a cutscene in Chapter 7 when Mario is sent to the moon.
Petal Meadows Blow-away-able Bushes
There is one area in Petal Meadows where Flurrie’s ability can be used to blow away the bushes. Doing this results in no reward whatsoever, and the bushes can not be blown away in any other area of that chapter.
Pianta Syndicate Obscure Dialog
By visiting the Pianta Syndicate before the end of Chapter 2, it's possible to meet Frankie and Francesca before they elope. This is only possible if the player already knows the passcode to enter the building, because the passcode isn't revealed to the player until after Chapter 2.
Giant Hole in Gloomtail's Room
After the last Bowser battle, there will be a giant hole in the secret room behind Gloomtail's arena, and jumping down will have the player fall into the main hall of the Palace of Shadow where Grodus, and later Bowser and Kammy were fought. However, it's impossible to revisit Gloomtail's arena after a certain point, making this Easter egg unused.
Unused Shopkeeper Dialog
All shopkeepers have unique dialog for when the player visits an item shop for the first time. However, because the player is required to visit a shop in order to access Chapter 3, the extra dialog for the shops in Glitzville, Twilight Town, Keelhaul Key, the Excess Express, and Fahr Outpost go unused.
Unseen Rawk Hawk Picture
If Mario is not the current Champion in the Glitz Pit, the picture of him in the Champion's Room will be replaced with a picture of Rawk Hawk. However, you only visit this room before becoming the Champion once during a cutscene, and the camera doesn't extend far enough to see the picture, so the player never sees it.
Chapter 7 Structure
Most map models in the game are numbered in sequential order that matches the game's progression per area, but the numbering in Chapter 7's areas suggests that the chapter's flow was reworked later in development to increase the chapter's length. The numbering of the battle stage backgrounds, which are numbered per chapter rather than per area, seem to support this.
In Fahr Outpost, the village's two rooms are directly after the entrance room, with the two intermediate pathway rooms coming after. This suggests that the path was extended, likely to allow for more enemy battles. The chapter's first stage background is for Fahr Outpost, indicating that enemies were part of the initial plan and not added later. Another possibility is that the extra path rooms were always planned, but instead as a path out from the village to somewhere else.
The Moon, like Fahr Outpost, also had its size increased by adding three new rooms to the end of the list. The rooms for the cutscene where Mario is launched through space are numbered after the first three rooms, before the new rooms. This wouldn't be too odd on its own, but strangely, the Moon's stage background is numbered after some of the backgrounds for the next area, X-Naut Fortress.
The rooms for the X-Naut Fortress are mostly in order, starting with the room that the first battle takes place in. The bedroom, shower, and TEC's room come after the boss room, yet other Peach-related rooms such as the locker room are in order, suggesting that certain aspects of the Peach interludes were changed after the area had been planned. The triple keycard room, needed to access the machine room, is second-to-last, indicating that the keycard requirement was added to either lengthen the chapter or to prevent Peach from going too far. Strangely, the entrance room is the very last room.
The stage backgrounds for X-Naut Fortress are divided into two groups: three before the Moon's and two after. The standard background with metal walls, the machine room, and the boss room are the first three stages. The backgrounds after the Moon are for the control room and the windowed rooms. The control room itself is not out of order, so it is likely that either the room did not always have an enemy guarding it, or its design was initially close enough to other rooms that it didn't need its own background. The windowed room being last is notable, as it is used for the area's first room. This indicates that windows were added later.
Looking at the numbers for these three areas together provides a rough idea of how the chapter was originally designed. The player would first arrive in Fahr Outpost, which was just a town with a few dangerous monsters outside. Then, perhaps after finding General White, the player somehow gains access to the X-Naut Fortress, but not by using a cannon. If the fortress were on the moon, the player may have used a teleporter, like the one in Rogueport Sewers. Otherwise, the fortress may have been located somewhere underground. The player would make progress through the underground fortress and fight the boss as normal. How the moon was involved is unclear. If the fortress was indeed on the moon, then exiting onto the moon's surface may have been a big reveal moment. If not, then the Moon section was added later to make the chapter longer and more interesting.


